


BitBox01 (Digital Bitbox) Review 2026
The BitBox01 (aka Digital Bitbox) is a small, inconspicuous hardware wallet from Switzerland. It was co-founded by Douglas Bakkum and Bitcoin Core developer Jonas Schnelli.
First Impression
The Webshop
The Digital Bitbox can be ordered via its own web shop for (ERROR - no price). You could choose from the credit card payment methods via Stripe and Bitcoin. For all customers outside Switzerland, FedEx’s Priority Express shipping method is offered. Although shipping is quite expensive at 28 dollars, the package was already there after two business days.
Digital Bitbox also has resellers around the world who resell hardware wallets on behalf. You will also find a reseller in your country.
Hardware Wallets should preferably be ordered directly from the manufacturer or official resellers if possible. Dubious stores or private sellers on platforms like ebay or amazon could manipulate the devices for their own purposes or trick the buyer. This way, the thieves can steal all the coins from your hardware wallet at a later time. Unfortunately, there have already been such cases in the past.
Packaging and contents
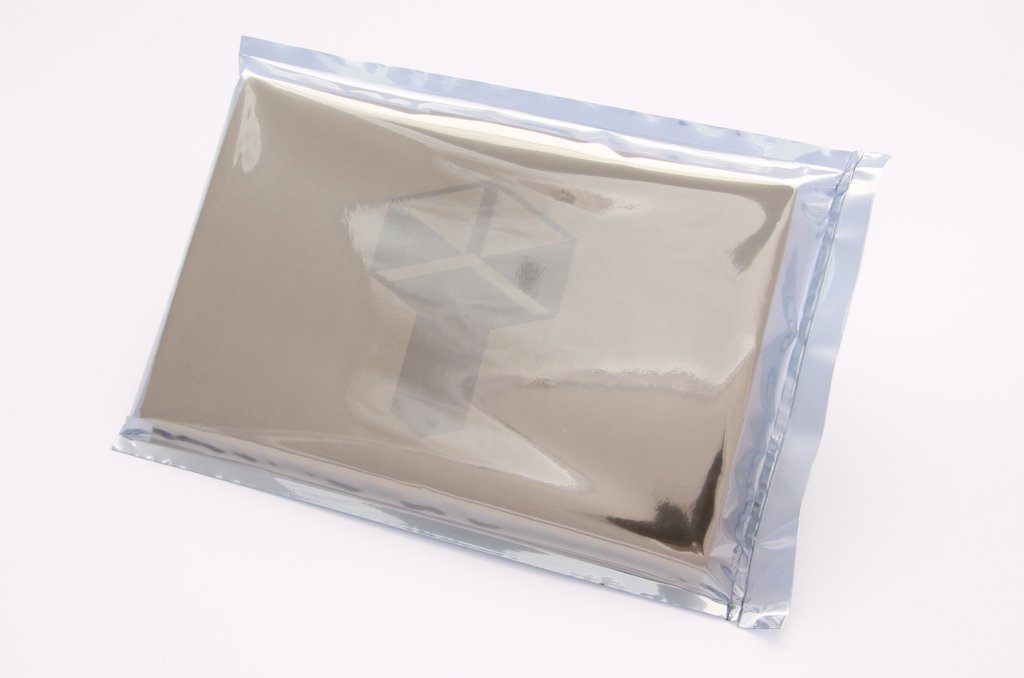
The box wrapped in protective film containing the Digital Bitbox
If you open the shipping envelope, you will find a small cardboard box packed in a protective film. In addition to the box, there is also a small card with information on the EU and FFC declaration of conformity and the guarantee.

After opening the protective film, one holds a cardboard box in your hand, which is simply printed with the Digital Bitbox logo and still contains some legal notices on the back.
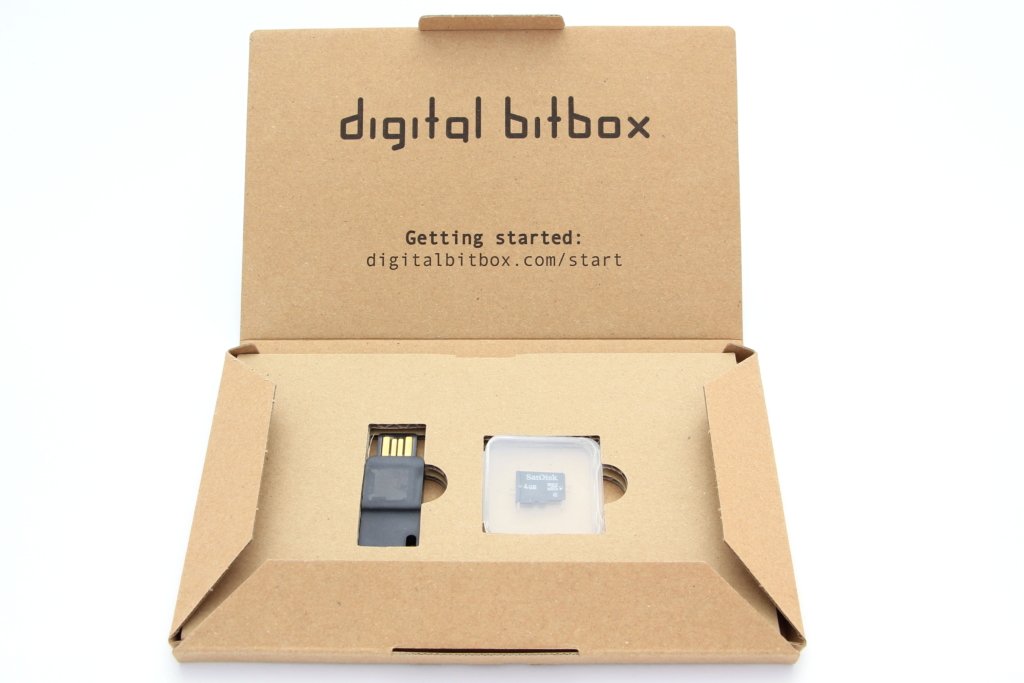
The box contains a note on setting up and the scope of delivery
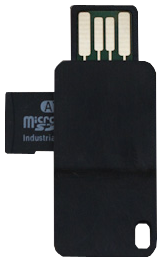
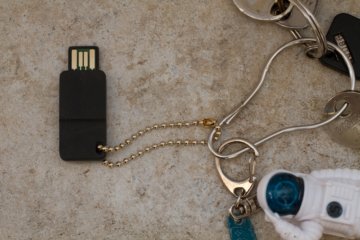
Finally, if you open the box, you can see on the left the Digital Bitbox in the form of a USB stick and a micro-SD card on the right .
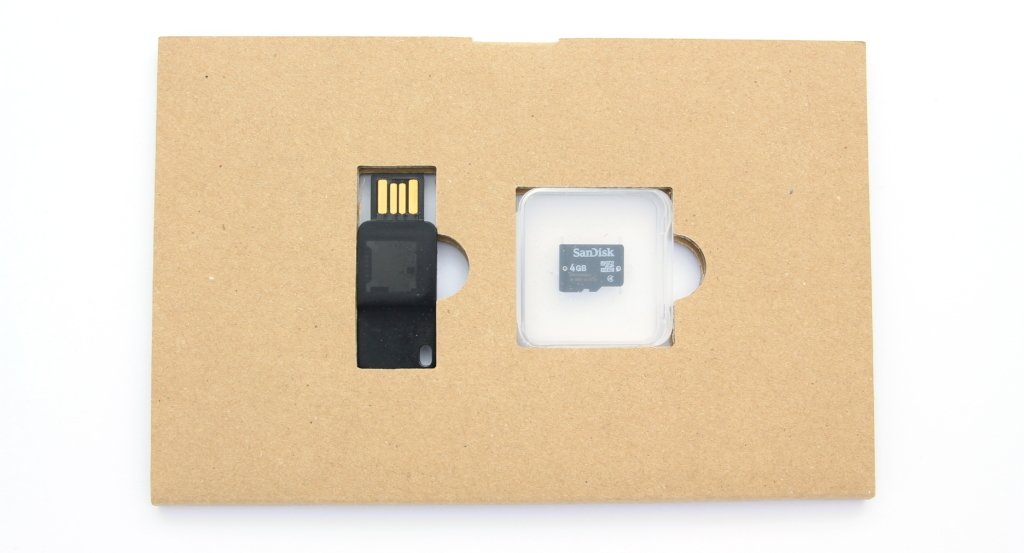
Included is the Digital Bitbox and a MicroSD card
There is no guidance or other accessories to just see the clue on the lid to go to the page www.digitalbitbox.com/start/ . Because here you are guided through the institution step by step.
Digital Bitbox
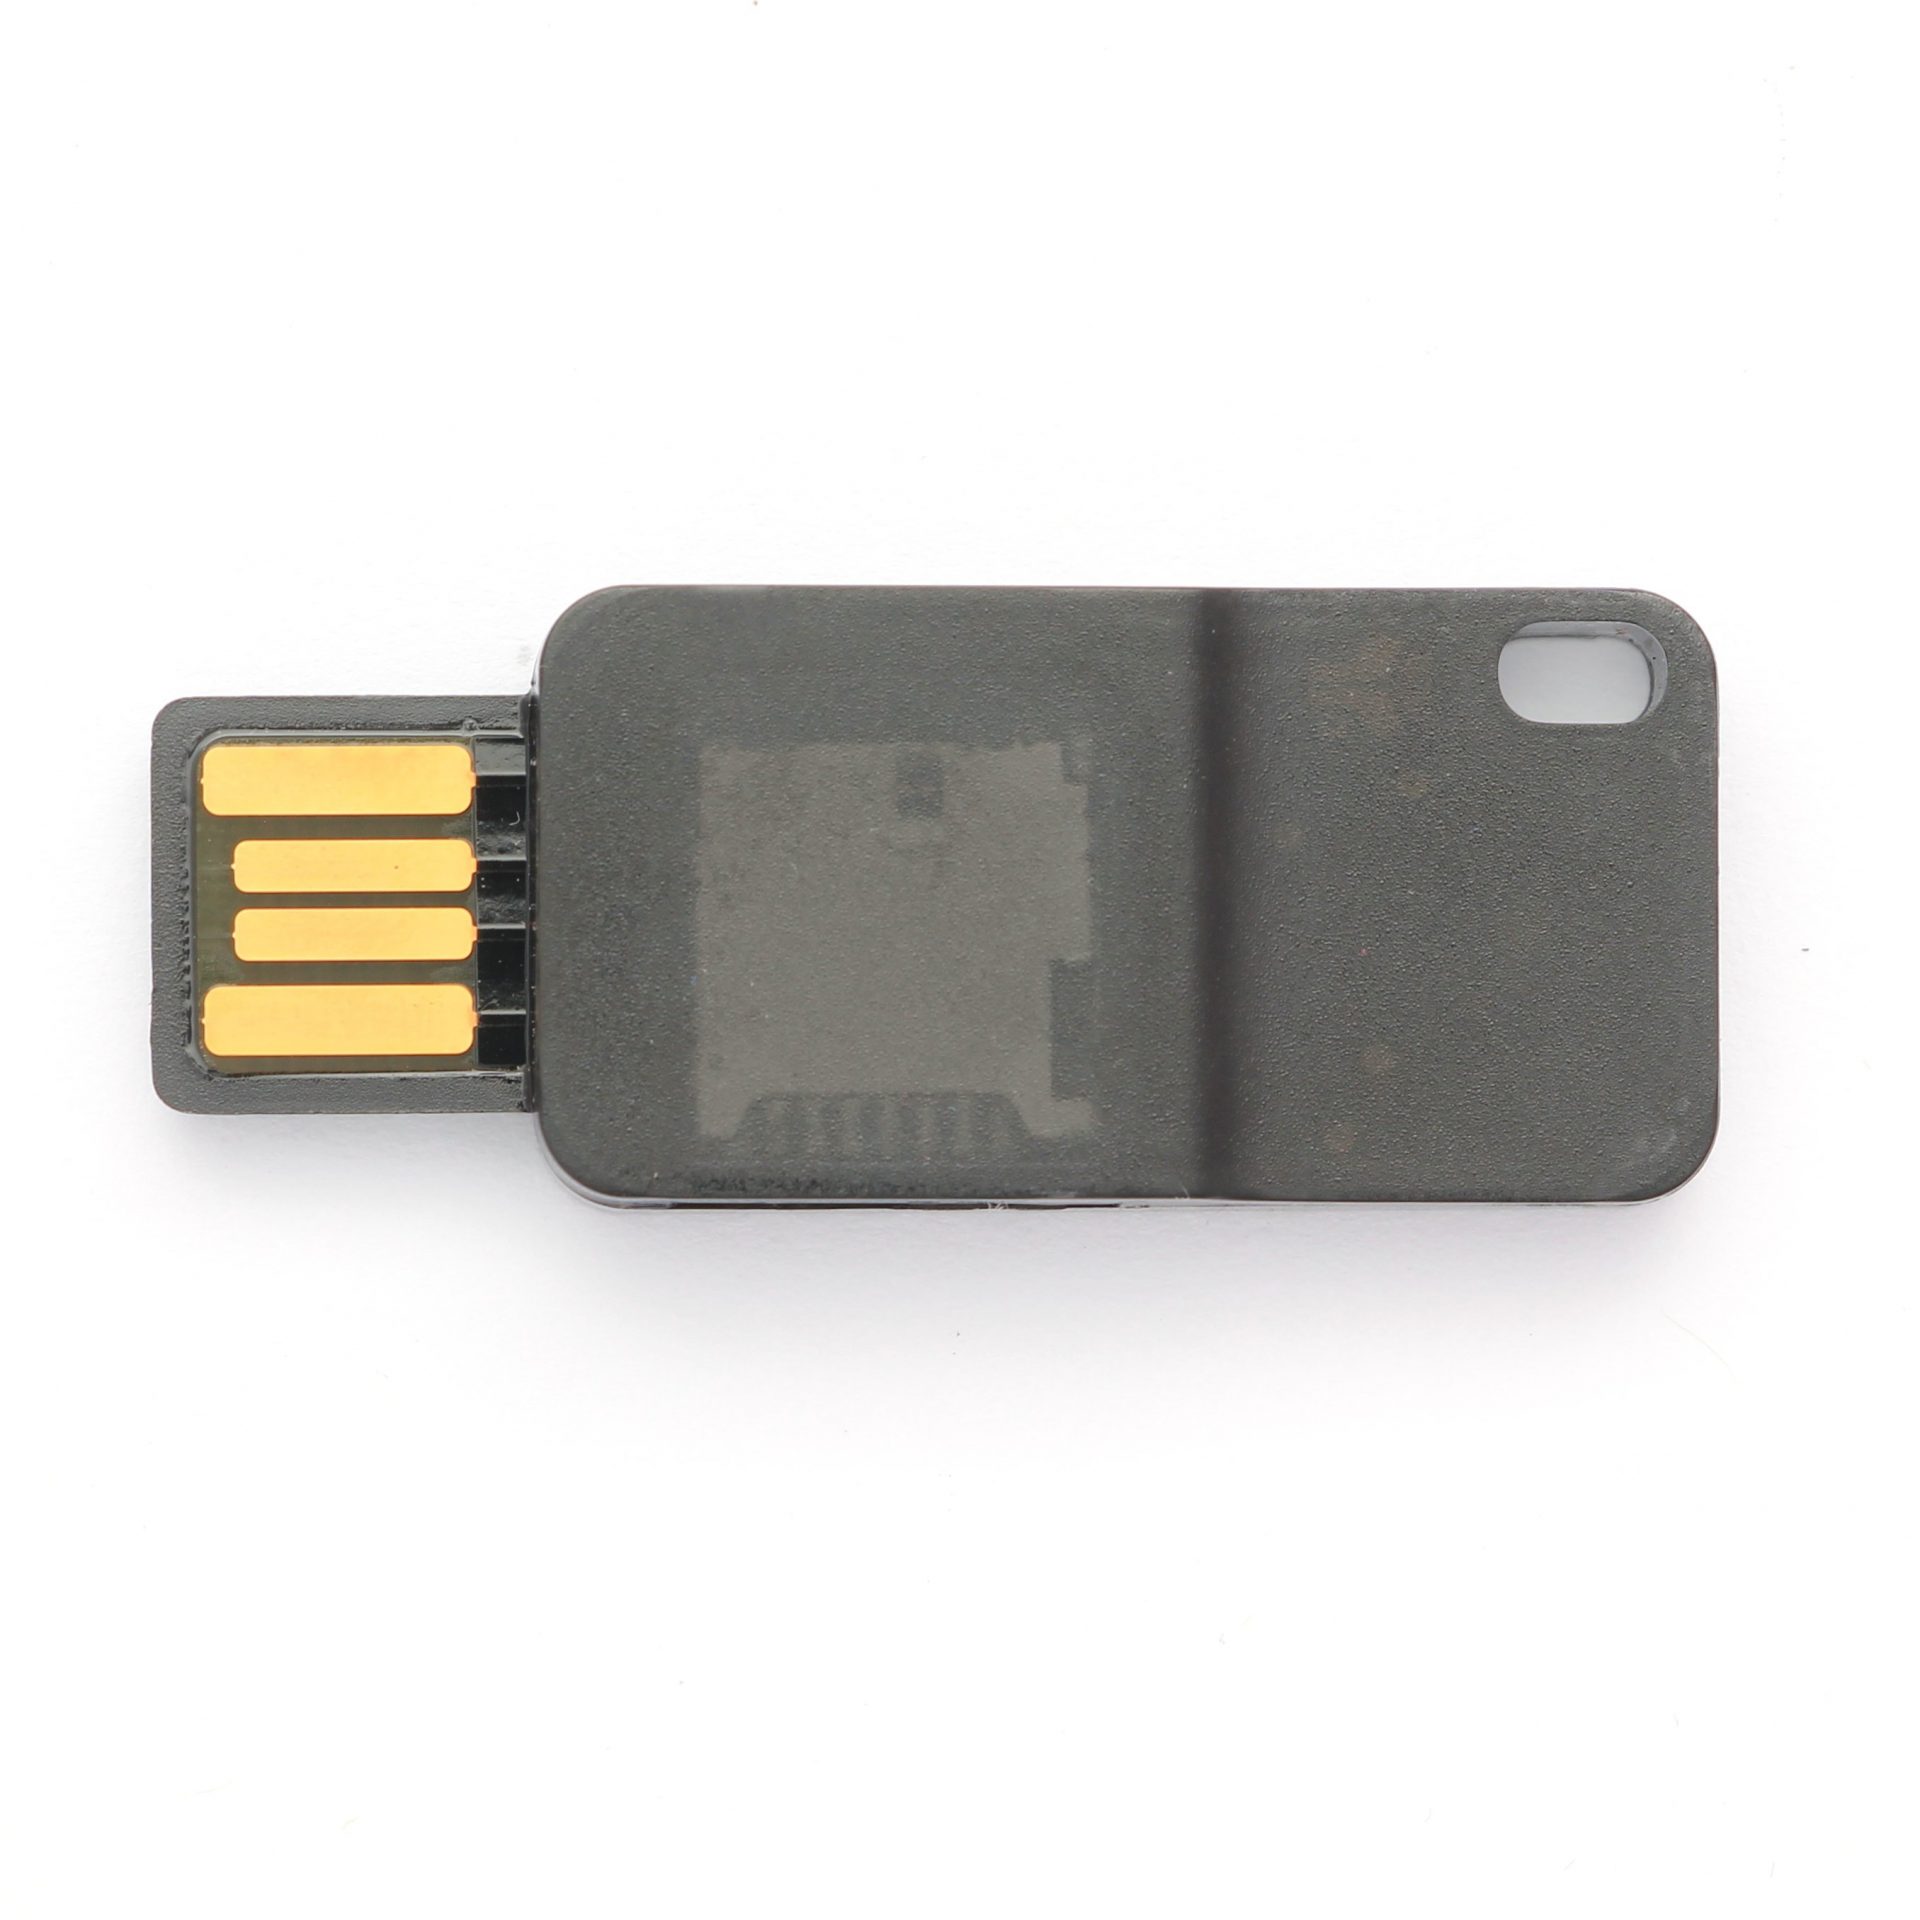
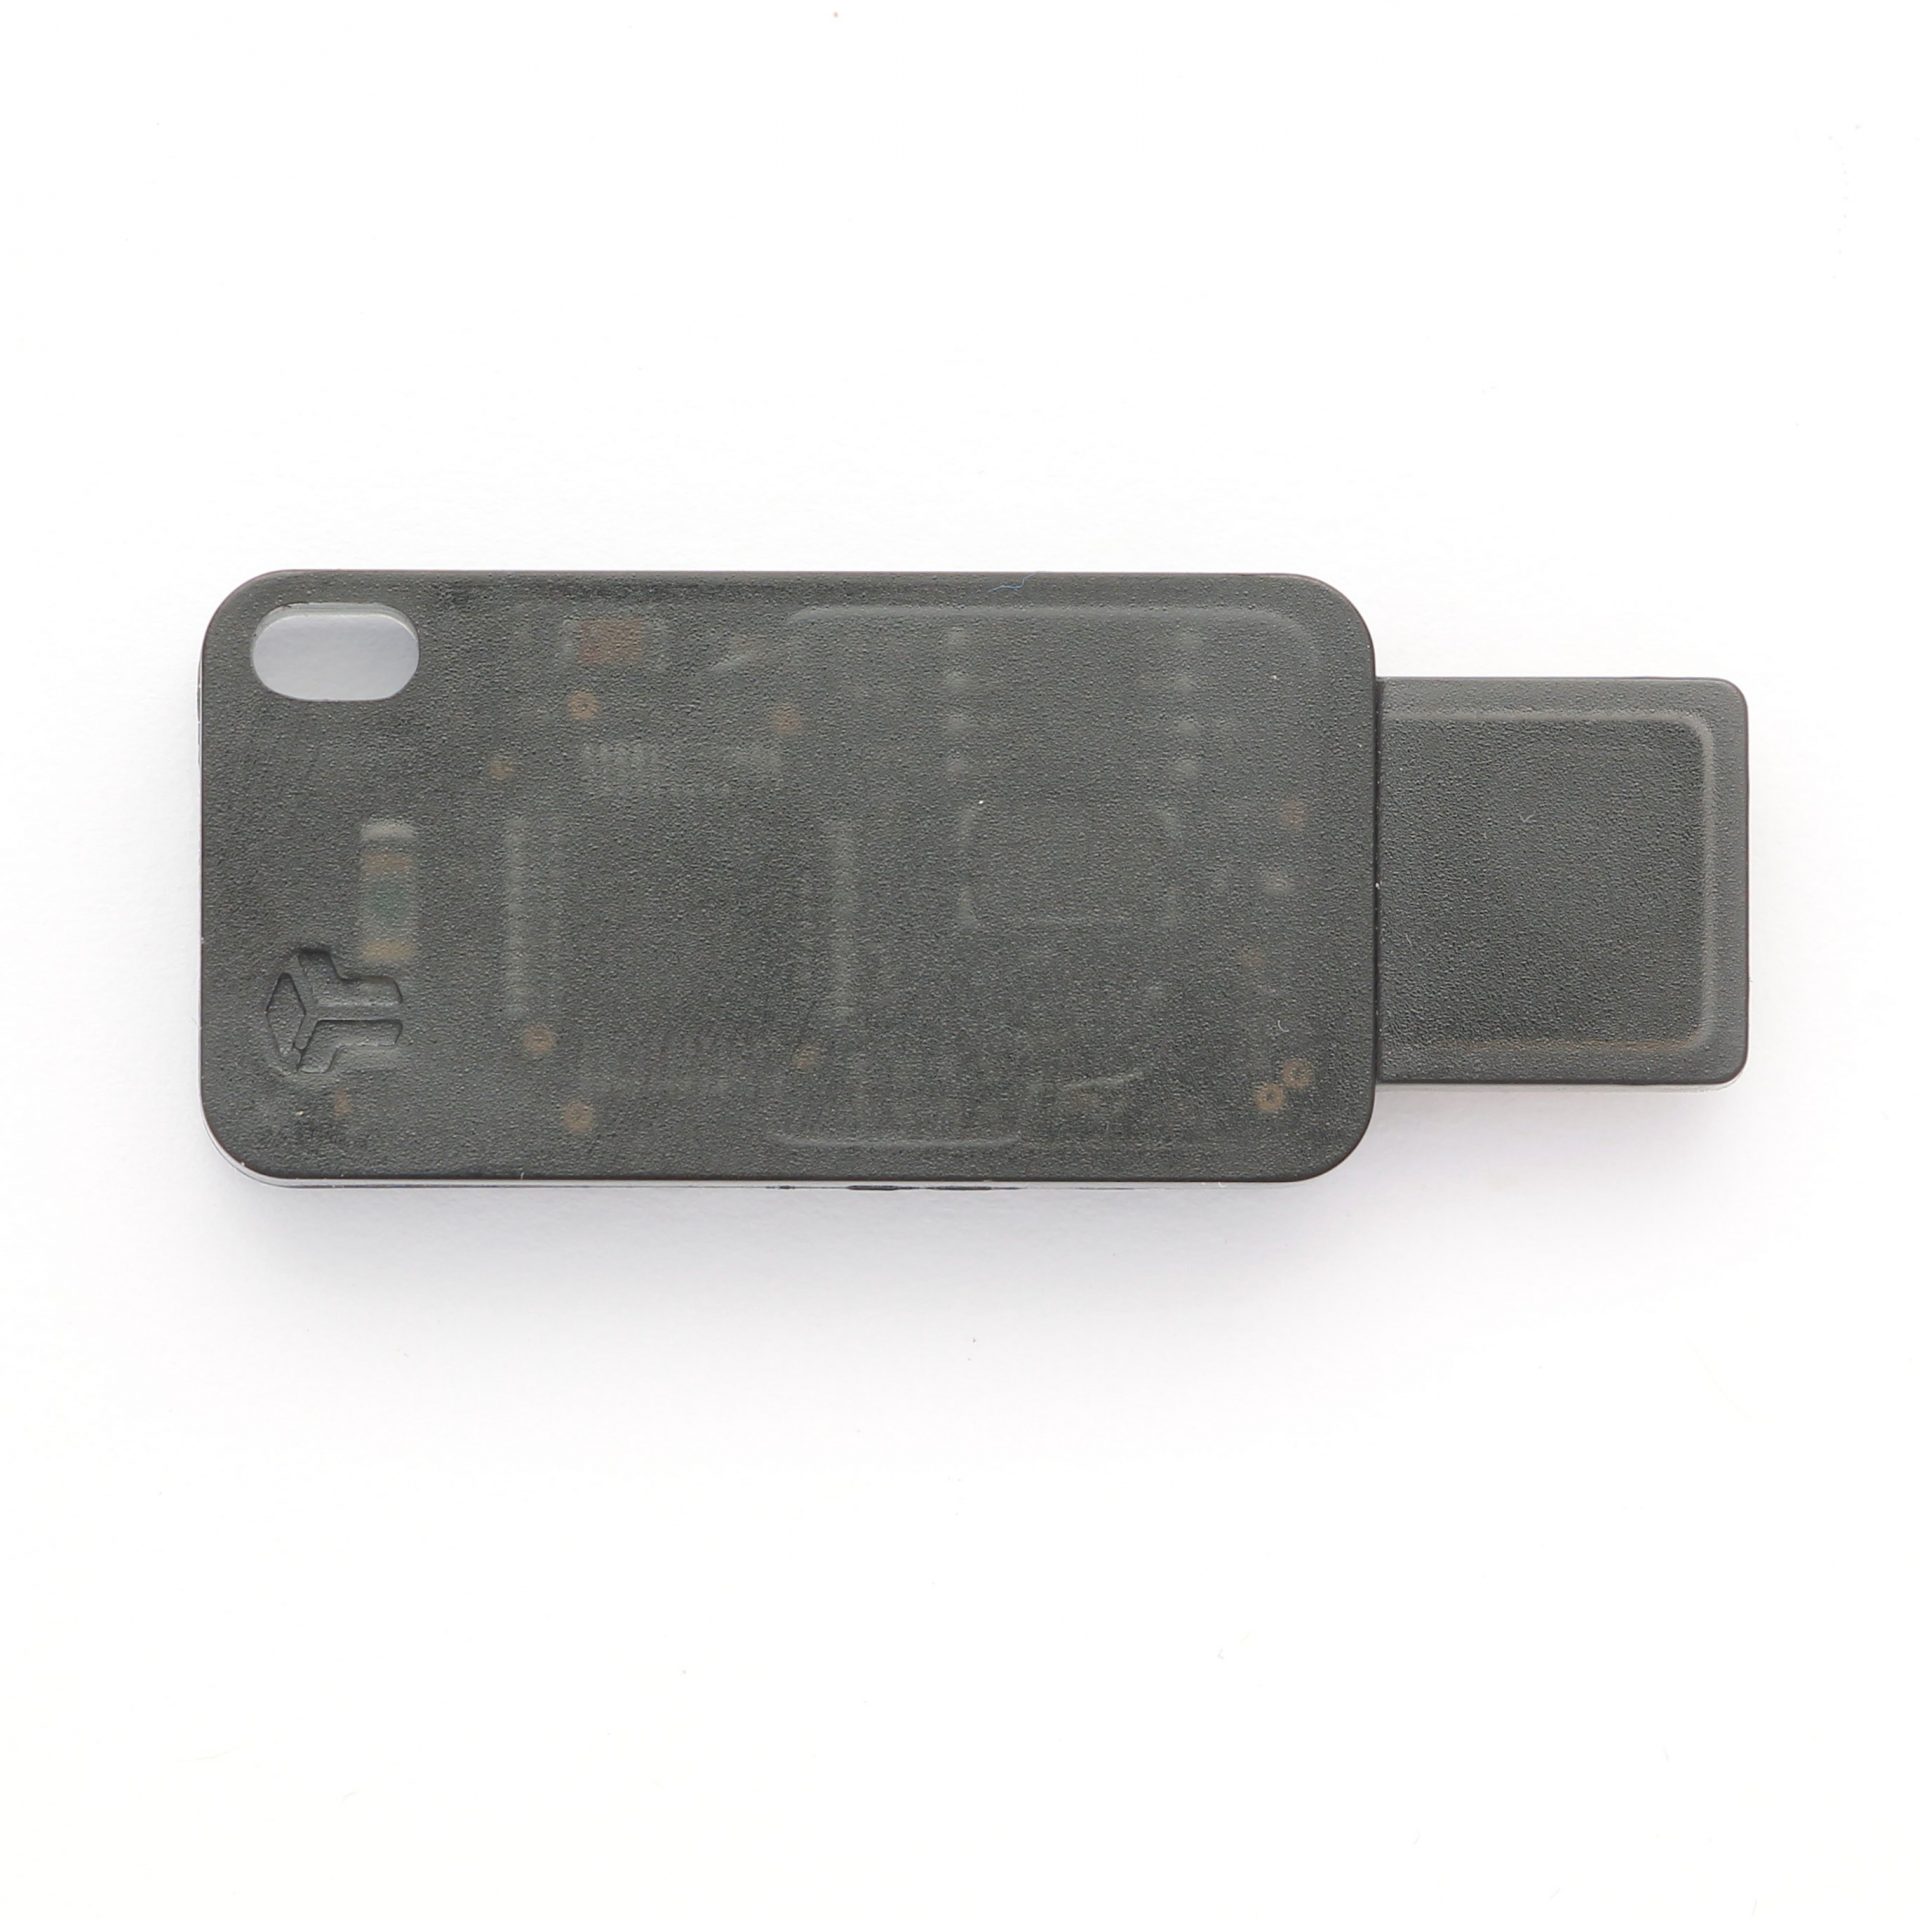
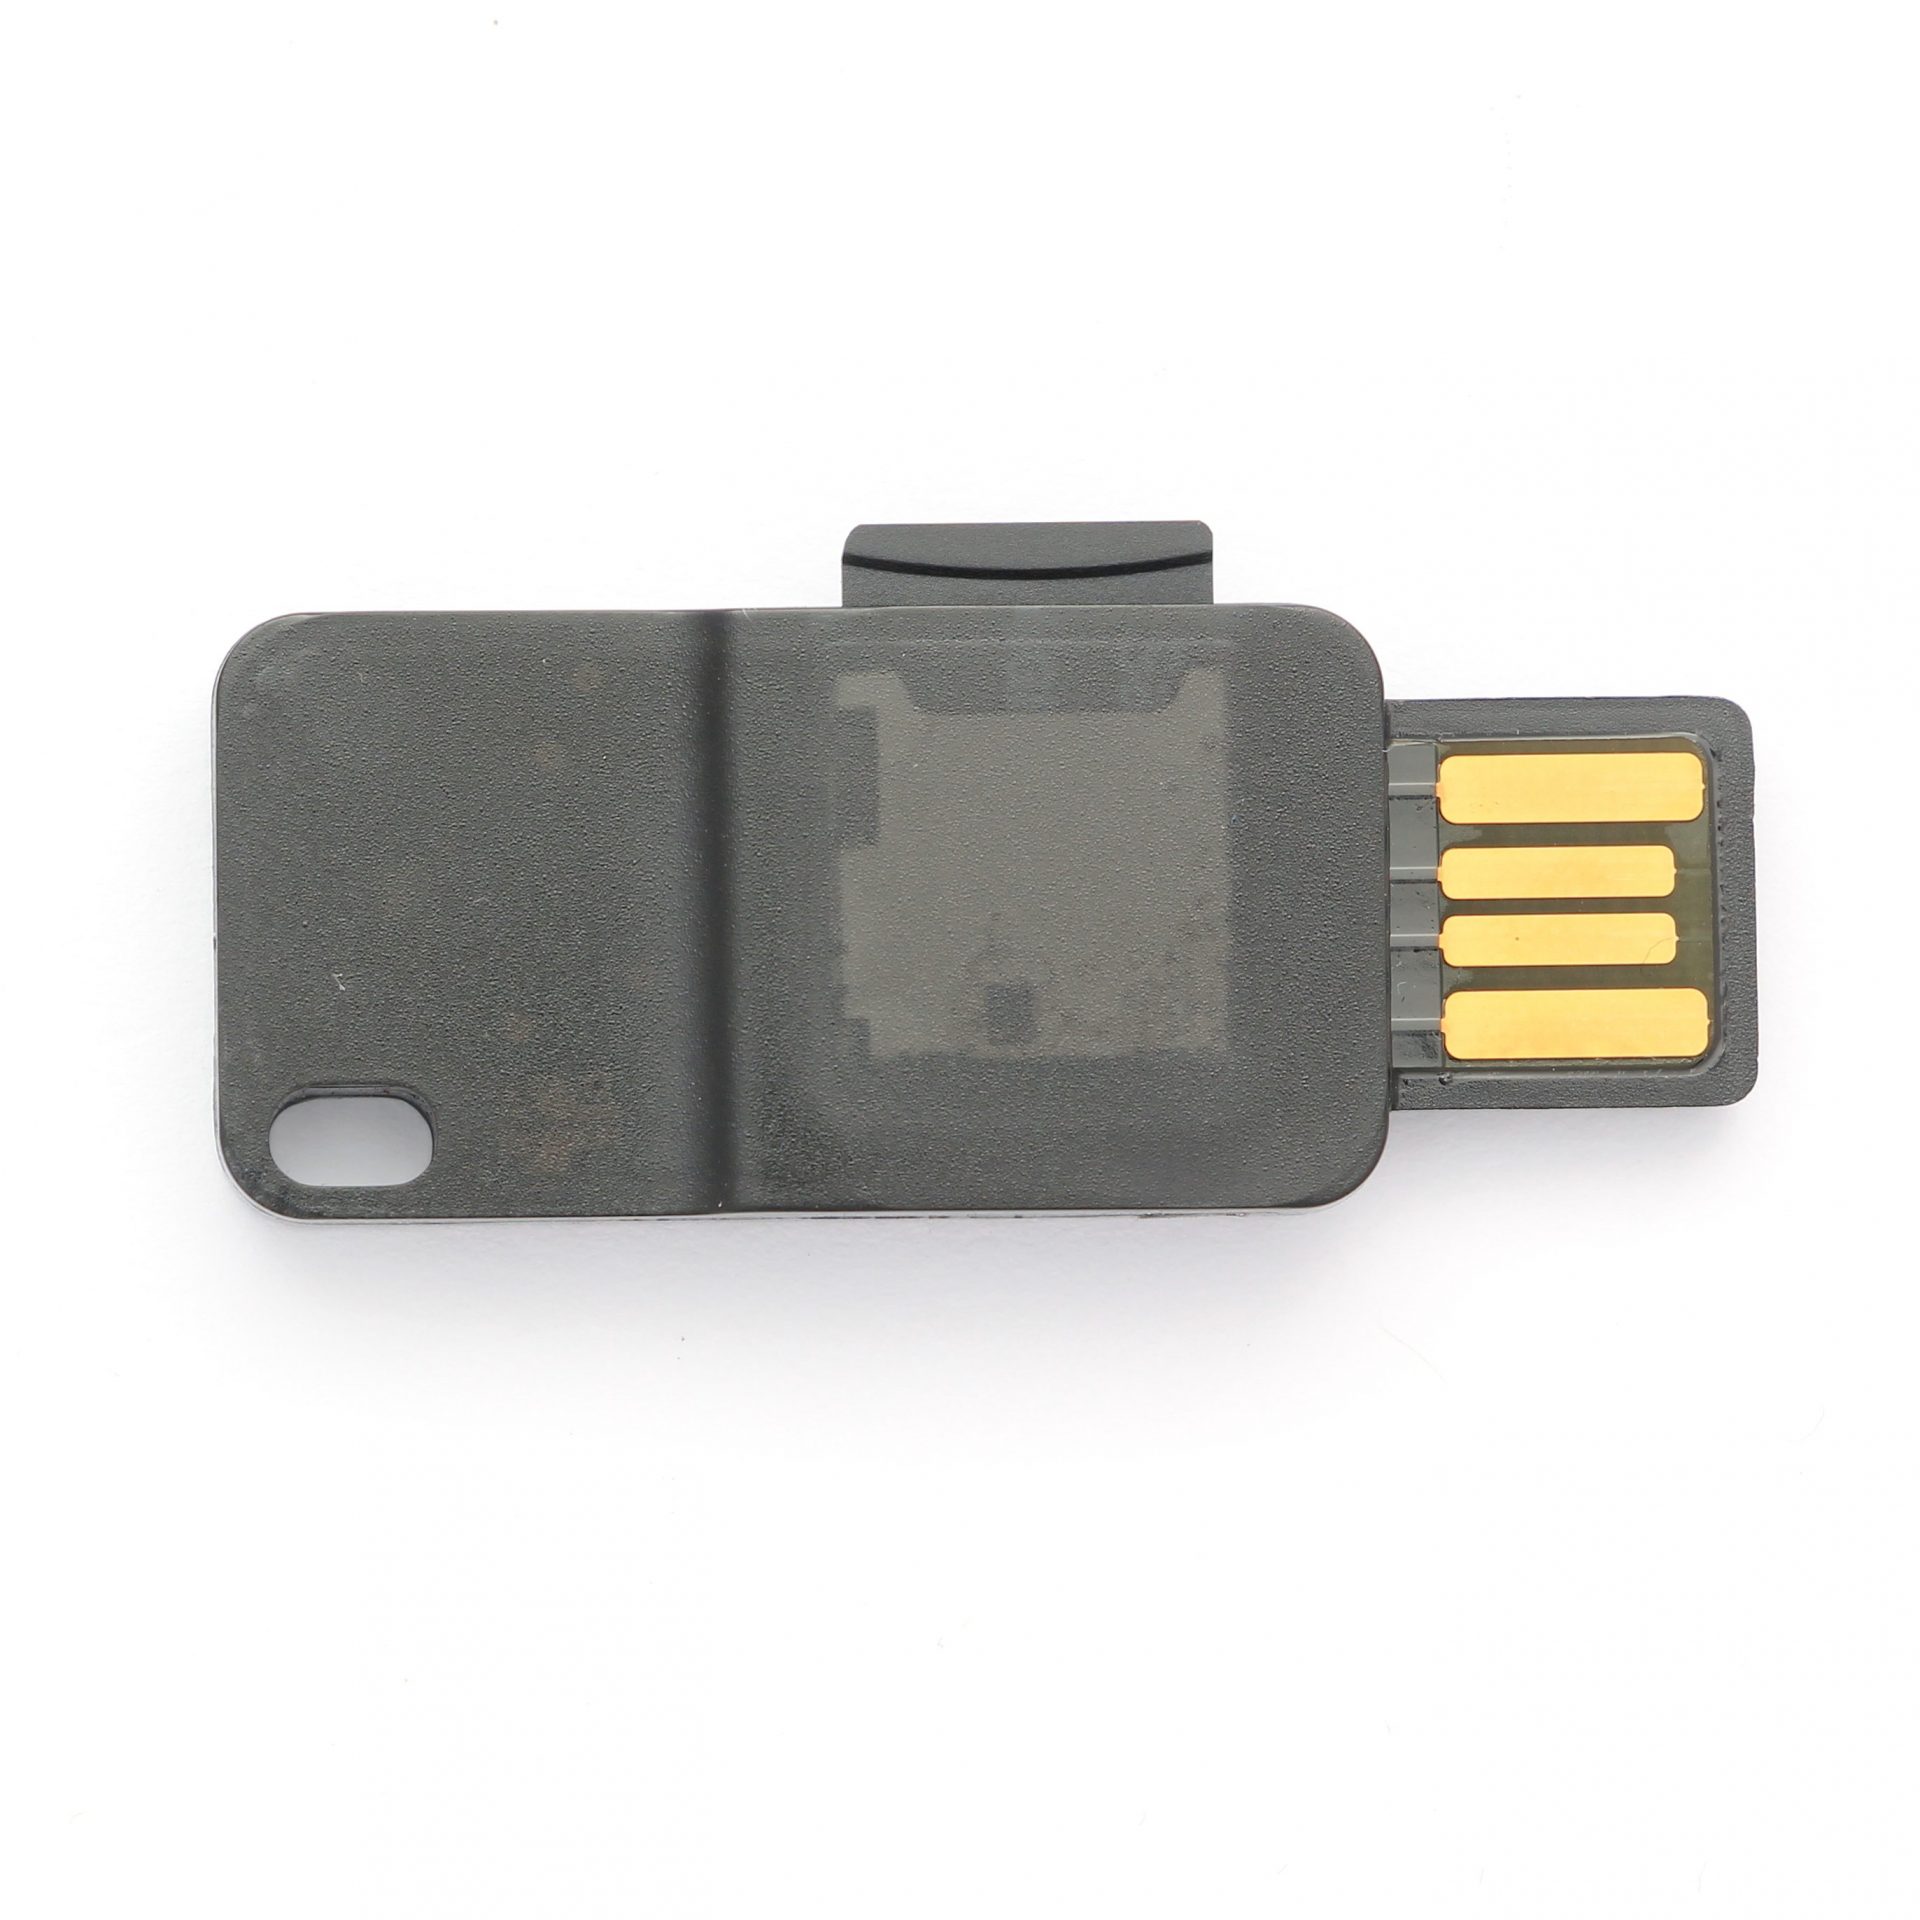
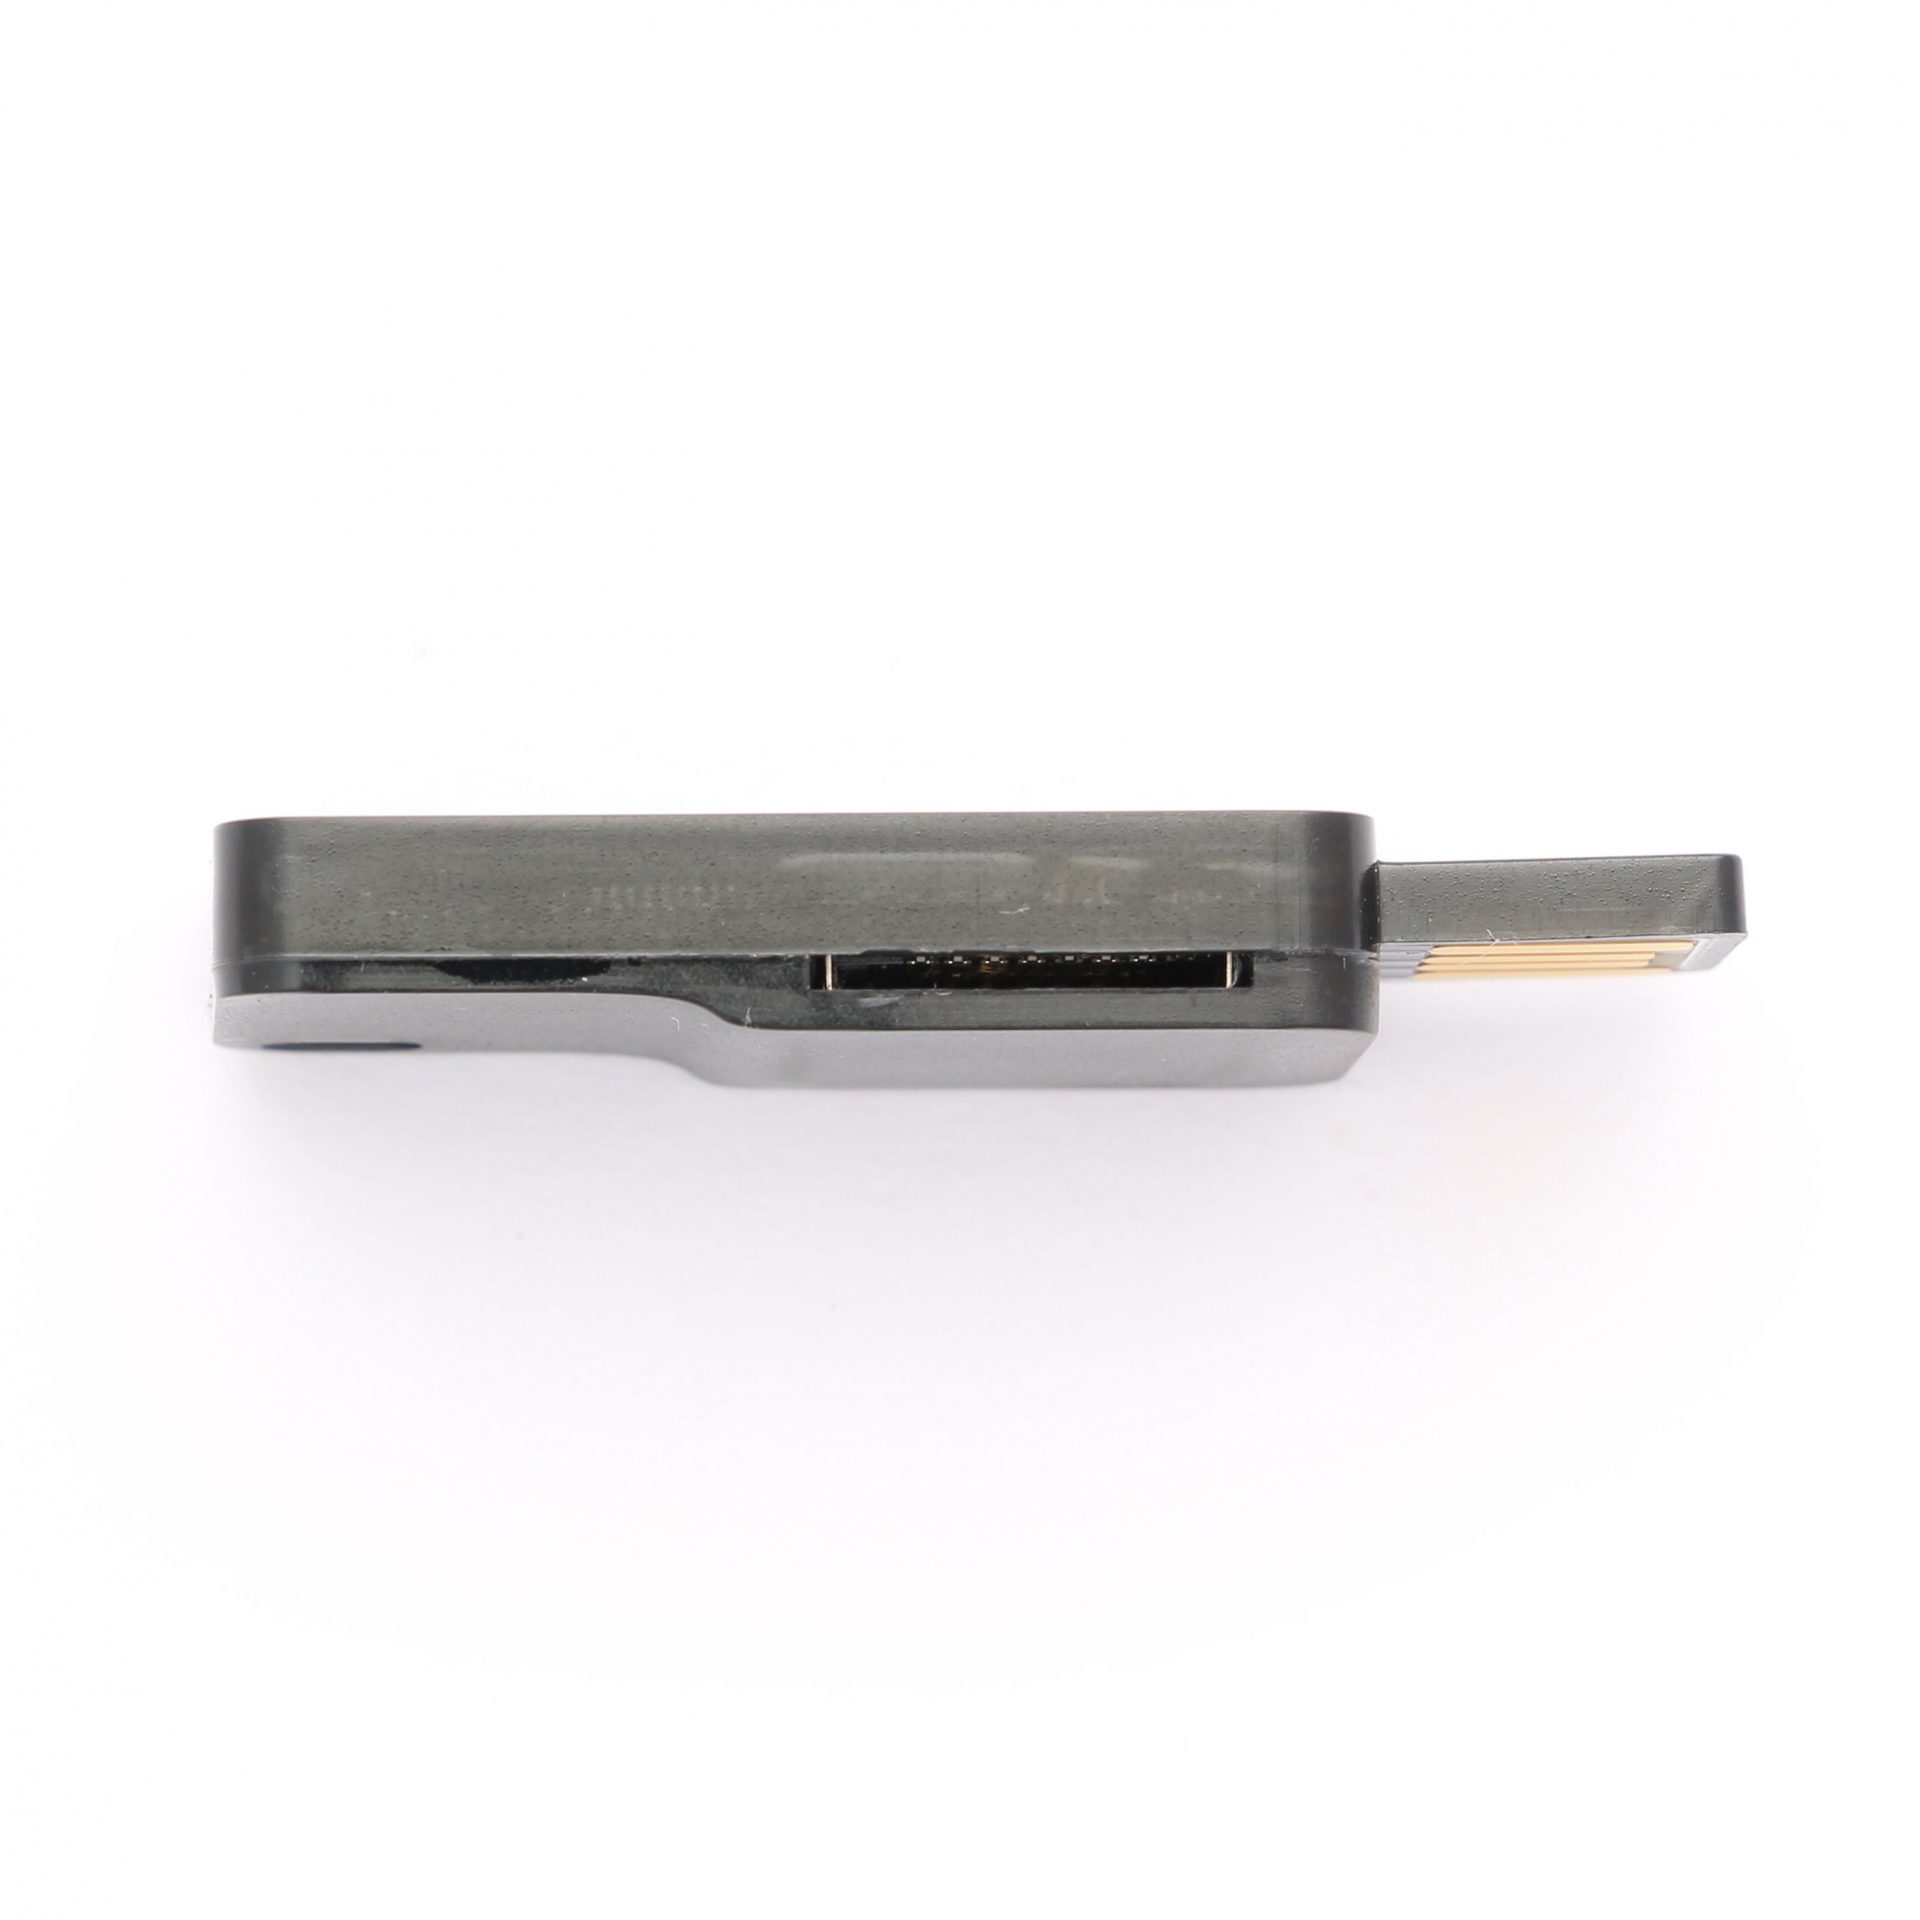
The Digital Bitbox Hardware hardware wallet is pleasantly small with 45x15x5mm and weighs only a few grams. In the process, she engraved the Digital Bitbox logo on the back and a small hole on the opposite side to attach a ring to it.
The back end of the front is somewhat flattened. Here behind is an LED and the Touch button to accept or reject actions later.
The case is filled with resin and made from the same material as gun-proof glass. This makes hardware wallet robust, which is why it can be worn on a keychain without any problems.
The SD Card
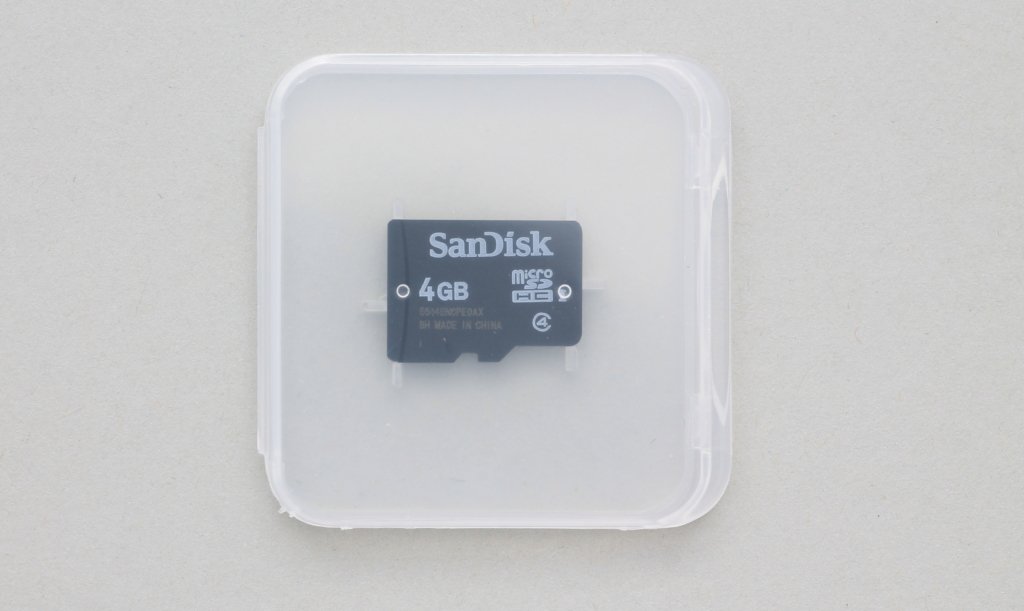
Included: A MicroSD card
The SD card is a Micro SDHC Class 4 by SanDisk with a size of 4GB. This is included in the price of hardware wallet and it is intended for the backup of the Recovery Seeds.
First Impression: Conclusion
The first impression is already very positive. Ordering via the Bitbox webshop was fast and smooth-as did shipping via FedEx.
I like the simple packaging in the printed cardboard box very much and even without instructions you know directly how to proceed. The hardware wallet itself is inconspicuous and very robust. I particularly like the fact that no further cable is necessary as with comparable hardware wallets.
Unfortunately, however, I do not have an SD card adapter, which is a pity because hardly any device has a MicroSD card slot. For example, if you want to replace backup PDFs to restore a wallet or print a backup , you need to be able to read the data of the card directly.
For normal use, an adapter is not necessary, but an expression of the fuse in paper form is certainly interesting for many.
Set up Digital Bitbox
Never use a hardware wallet that is already set up. You must choose your own PIN code or password and do the backup yourself. This is not given by anyone!
So I open www.digitalbitbox.com/start/ and start setting up the hardware wallet step by step.
Download desktop application
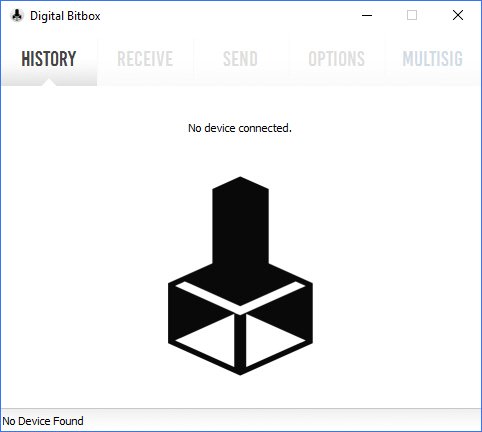
Digital Bitbox’s Windows Client after launch
The first thing to do is download the desktop application. This test uses the Windows app, which can be launched after a short installation.
Configure Digital Bitbox
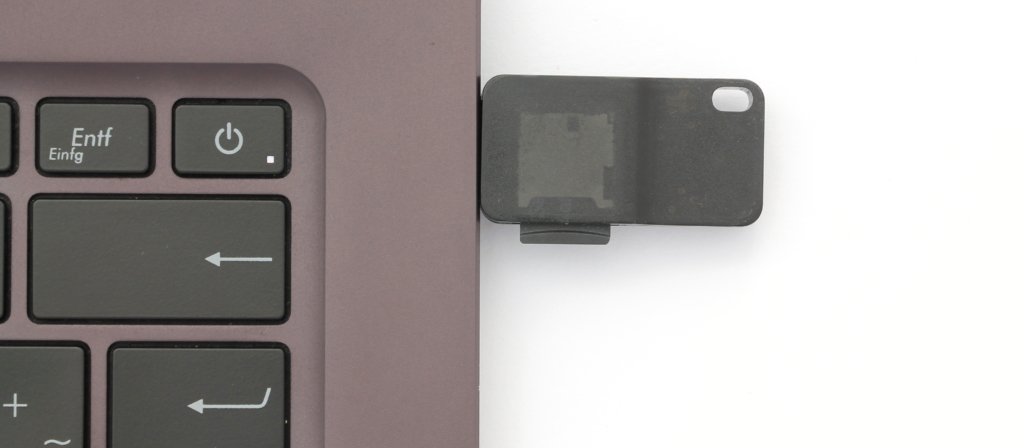
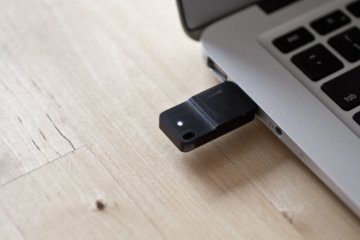
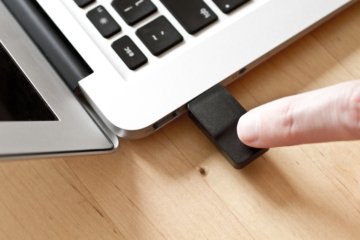
The Digital Bitbox is connected directly to the PC and does not require drivers
Now it’s a matter of configuring the hardware wallet . To do this, they are connected to the computer on which the software was previously installed. It is important to plug the SD card into the first set up. The backup of the wallet is stored on it.
If you forget the SD card, this is not a problem, because you can also plug it in after a hint, without which you have to start again from scratch.
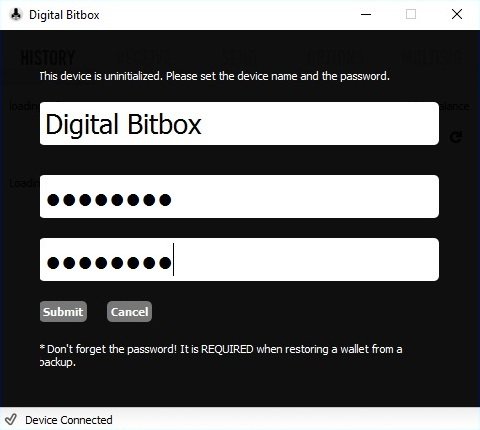
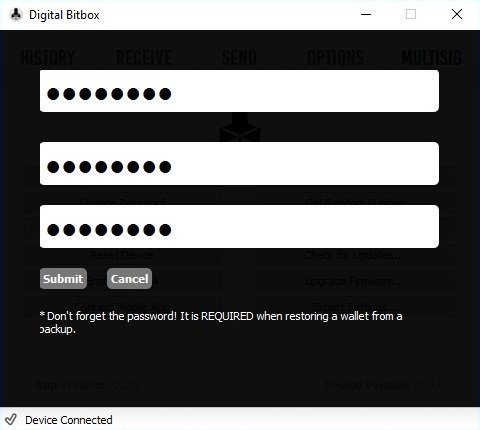
The software reacts immediately after plugging in the small stick because no drivers are needed, and a name can now be set for the wallet and an device password.
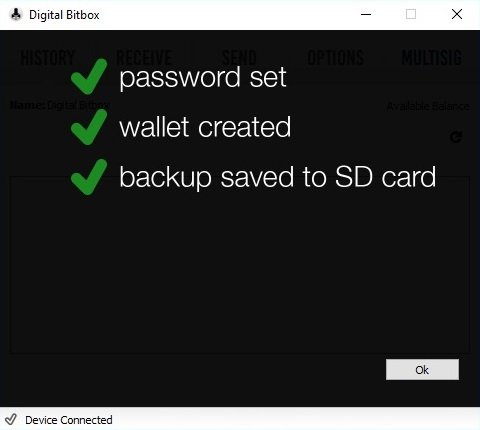
Therefore, for each generated wallet, it is important to remember the current device password well or, if necessary, to write down it in handwriting. By clicking on “submit,” the wallet is created and a backup is stored on the SD card. This happens completely automatically and you don’t have to write down data yourself in handwriting! In addition to the hardware Random Number Generator, the extended private key is generated by random elements from the password as well as by randomly placed bytes during the installation of factory settings.
Those who do not trust the random generation of the hardware wallet can also generate their own keys through self-selected data and load the Digital Bitbox onto via the SD card.
Keep backup safe
The backup in the form of a BIP32 master extended private key, additionally backed by the password used at the time of initialization, is now offline on the SD map. It does not use the familiar 12 or 24 words Backup Seed as you know it from Trezor or Ledger, for example.
Your Recovery Seed is the backup key to all your cryptocurrencies and apps. The Recovery Seed (backup) can only be viewed once. Never make a digital copy of the Recovery Seed and never upload it online. Keep the Recovery Seed in a safe place, ideally also safe from fire and water. Special backup products, for example Billfodl are suitable for this.
No one but yourself can be held liable for any financial losses caused by improper handling of sensitive data.
Once set up, you should keep the SD card separate from the device for security reasons and plug it in only to manage the wallets.
Paper fuse
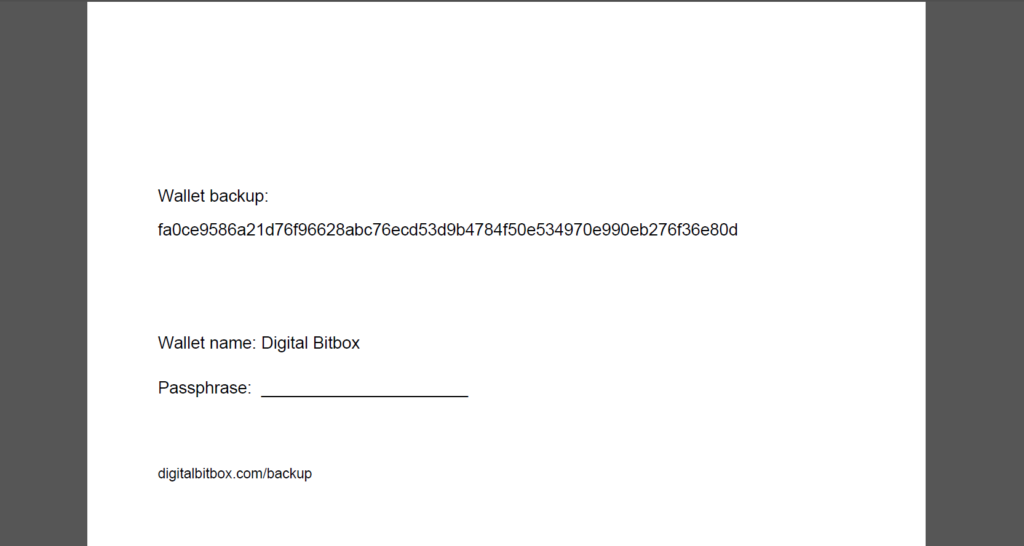
Excerpt from the backup file from the SD card
If you don’t want to rely on the durability of your SD card, you also have the option of printing out a paper fuse. To do this, you can read out the Micro SD card or connect it directly to the printer. In the subfolder/digitalbitbox/there are .pdf files of all the wallets created so far. This can be printed out and, if necessary, can even directly record the device password used at the time of wallet generation.
One should be aware at this point that connecting the SD card to a computer or printer always carries some risk, since securing the wallet could be visible to attackers, for example by logging the printouts together or the like.
Now the wallet is ready for use.
Setup: Conclusion
The basic setup of the hardware wallet was easy and understandable and done in a matter of minutes.
It is also as fast as no other hardware wallet, as the backup is automatically written directly to the SD card.
Handling
So now that the wallet has been finalized, a close look is taken at various functions of the hardware wallet and the client.
Perform transaction
In order to carry out a transaction with the Digital Bitbox yourself, you first have to receive coins.
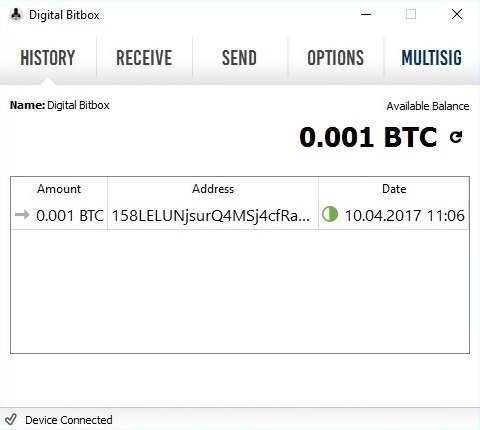
To do this, you can navigate to the “Receive” tab and send some Bitcoins to the name of the address. After a short time, according to the “Available Balance” indicator, you have an account balance of 0.001 BTC.
To send the received bitcoins again, you navigate the “Send” tab.
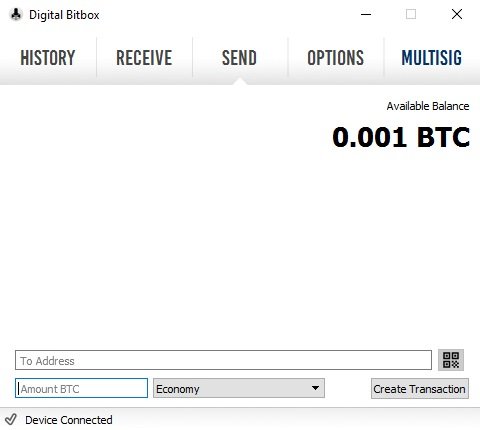
Send Digital Bitbox Bitcoins
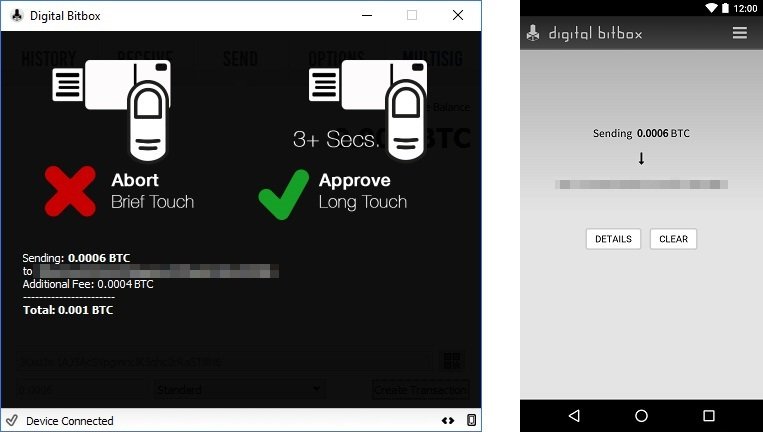
Now a recipient can be given address, the number of bitcoins to be shipped and the amount of fees. Via the “Create Transaction” button, the transaction is sent to the hardware wallet for verification.
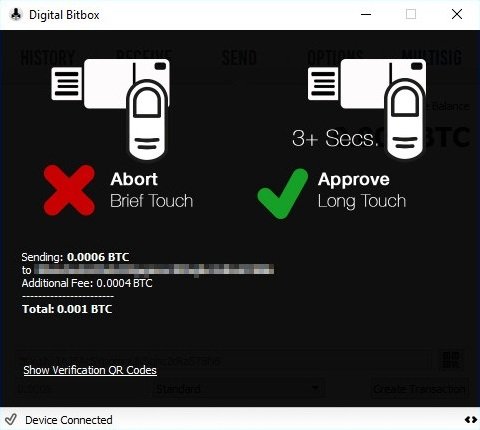
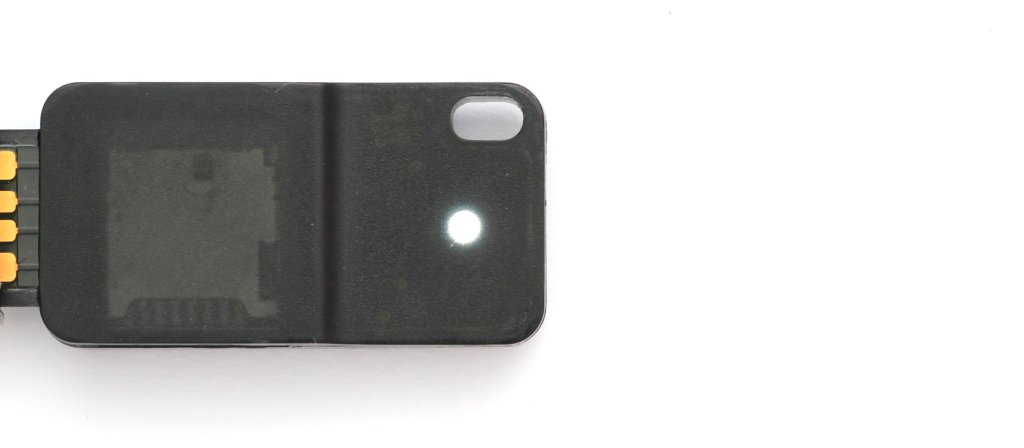
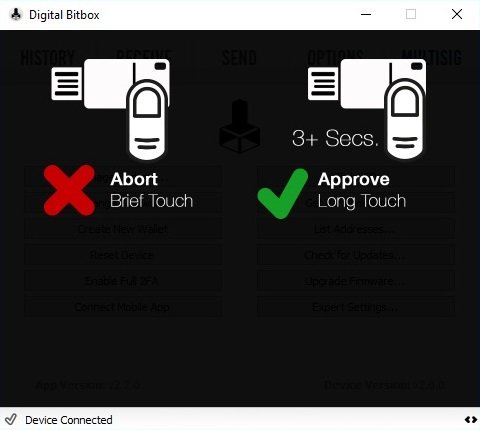
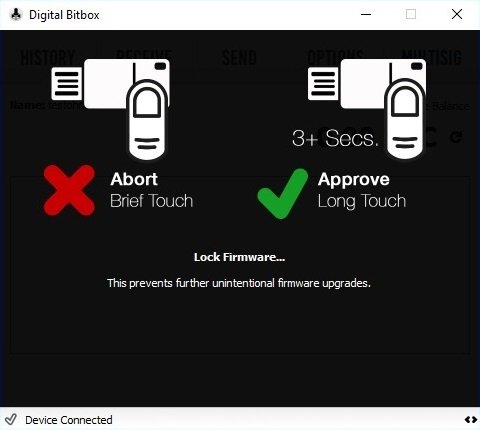
Flashes the LED must be pressed here to accept or reject the transaction of the Touch Button
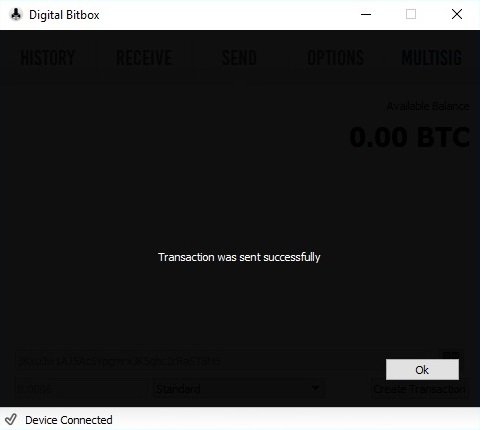
Now the LED of the hardware wallet starts flashing and you have 30 seconds to cancel or accept the transaction. To accept, the Touch button must be pressed for more than 3 seconds and the transaction is sent to the network.
Since the Digital Bitbox does not have a display, the standard configuration requires the fact that the correct transaction has actually been verified and that it has not been tampered with. Later, the possibility of smart verification and two-factor authentication, in which the smartphone comes into play as a display, is described.
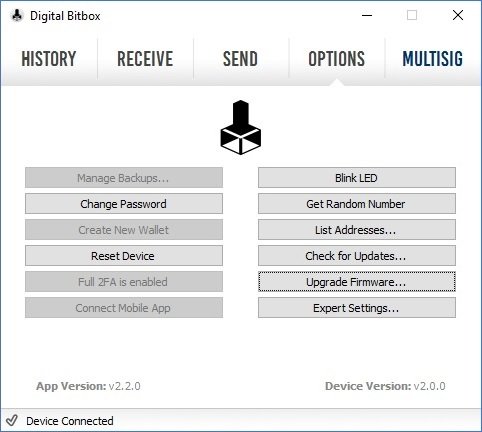
Settings
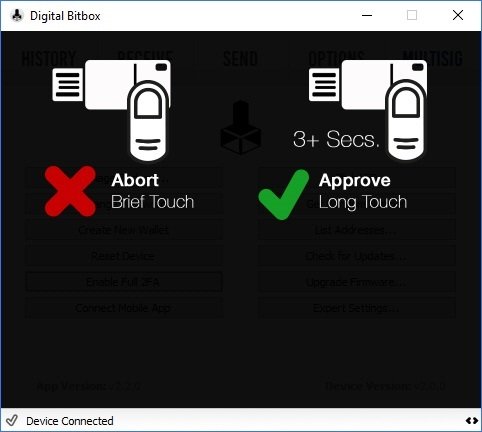
The Digital Bitbox Wallet offers the following other features.
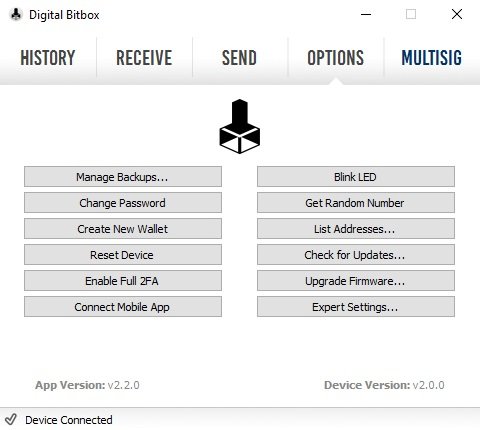
Digital Bitbox Options Tab
Manage backups
Unlike other hardware wallets, the Digital Bitbox allows you to secure your current wallet at any time and as often as you want. In addition, you can switch between different wallets with one click, because all the necessary recovery information (apart from the password) is stored on the SD card.
So you don’t have to type in a recovery seed, as you know it from Ledger or Trezor, for example, but the Digital Bitbox process is no less secure because all information is also offline but stored digitally.
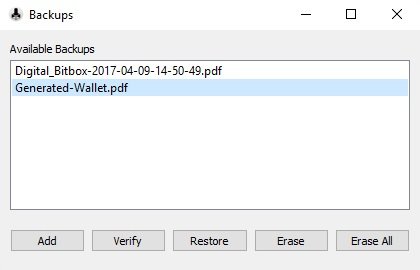
This view shows all existing backups on the SD map
So to manage your wallets, you have to click the “Manage Backups” button with the SD card. Here you can switch between individual wallets with the Restore button or reset a self-generated wallet, for example to select the two-factor authentication that you previously imported manually. With the “Verify” button, you can test a selected backup to see if it actually represents a backup of the current wallet.
Change devices password
You can also change your device password at any time with the options. To do this, select the “Change Password” button.
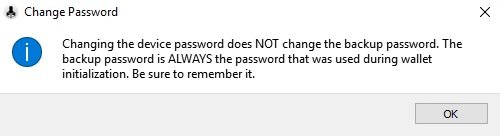
The password change does not affect the recovery password of old wallets
Again, the hint appears that a changed password does not change the backup password of old backups. This password is always the one that has just been used in wallet initialization.
Now you enter the old password and the new password, which must consist of at least four characters. This action must also be confirmed via the Touch button. This password is now the backup password of all future wallets.
Generate new wallet
These “Create new Wallet” options allow you to generate a new wallet at any time.
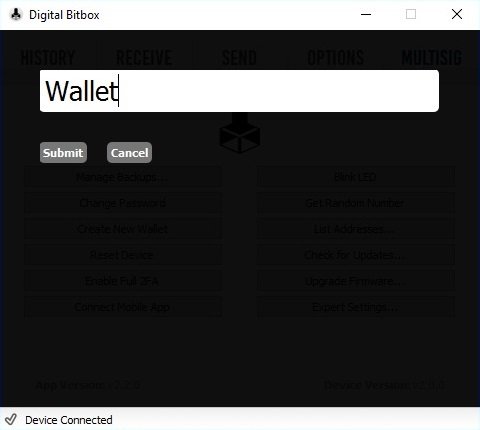
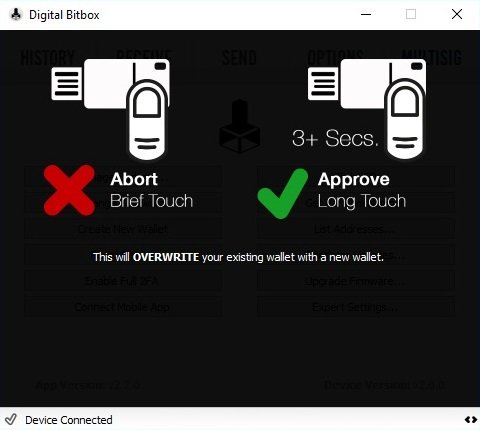
To do this, you set a name for the wallet. As a backup password, the current device password is automatically used. Again, you have to confirm this action directly via the Touch button. Here is the hint that the current wallet is being overwritten because the hardware wallet can only manage one seed in the configuration at a time. Therefore, you should check beforehand whether there is a working backup of the previous wallet if you want to switch back to it.
In the meantime, if you have not plugged in an SD card, you will get the hint that the backup could not be created. In this case, however, you can easily use the “Manage Backups” function to manually create one once the SD card is plugged back in.
Perform firmware upgrade
At the time of the test, the version 2.1.1 is up-to-date, which can also be seen on the options tab at the bottom right of the corner.
The current firmware version is available in the online download directory of Digital Bitbox. The current version is downloaded and then clicks “Upgrade Firmware” in the Digital Bitbox software. Here you first select the downloaded .bin file.

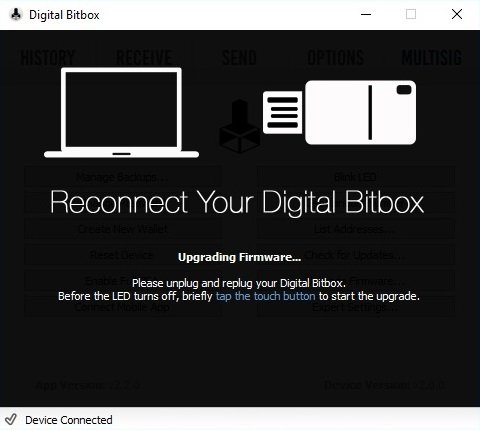
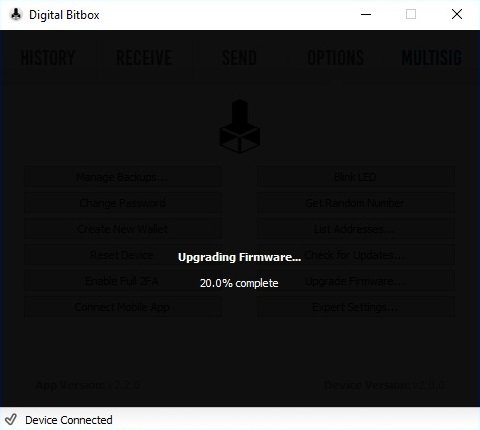
Then you confirm the action and then have to disconnect the hardware wallet from the USB slot and reconnect it. Now you have a few seconds to type the Touch button briefly so that the upgrade can start.
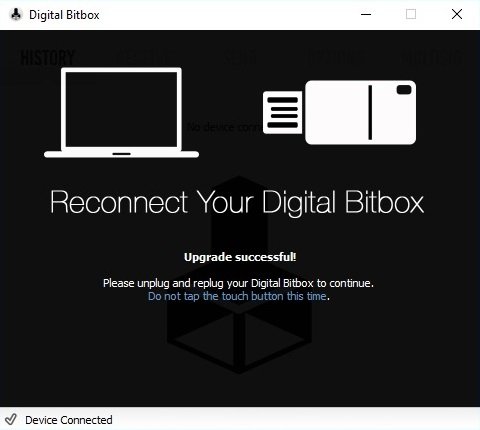
After a short time, the upgrade is ready and you need to reconnect the Digital Bitbox to complete the process. This time, however, you shouldn’t press the Touch button, otherwise you’ll get into boot loader mode.
So now you can type in your password as usual. After logging in, however, you have to confirm an action via the Touch button again in order to prevent unintended upgrades in the future.
List addresses and generate public key
The generated addresses are based on the standard BIP44. If you are more familiar with this, you will certainly be happy about this option.
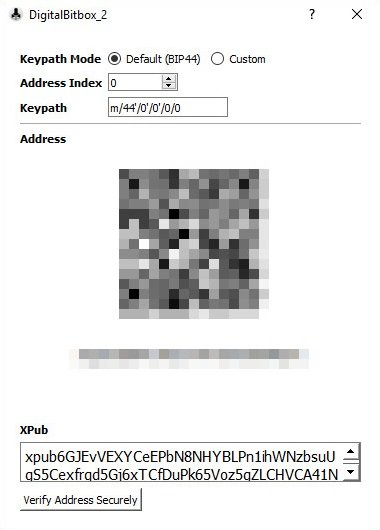
Generate addresses or public keys by a specific path
The “List Addresses” option can be used to generate addresses using self-selected parameters. This is interesting, for example, if you want to transfer bitcoins to a second account of the same wallet.
Or if you want to generate the extended public key for your entire account, for example, to monitor your account balance with an app.
Resent to factory settings
If you want to reset your device to factory settings, for example, to disable two-factor authentication, you will also find an option in the settings.
After resetting, you set up the wallet again as the first time. You can then use the “Manage Backups” feature to restore old backups because they won’t be deleted during resets.
Backup Center
Digital Bitbox provides a small Java tool that offers additional and non-everyday functions. You can either download this from GitHub and run it offline locally, or trust the corresponding “Backup Center ” page on the official homepage and run the same tool online there.
Restoring a wallet
If you lose their Digital Bitbox or can no longer use it due to a defect, you can use this tool to restore their wallets generated with Digital Bitbox with the help of the backups.
Restore a wallet from the backup and password used in generation
To do this, the form first includes the backup of the wallet, which is located on the SD card or the printed .pdf file. After typing in your device password used at the time of initialization of the wallet, you can use the “Generate” button to generate the BIP32 extended master private key as well as a special Electrum Recovery Key.
With the help of these keys, you can restore your HD wallet with any compatible software, so that you have access to all the child keys with your new software, online or hardware wallet . Of course, you can also simply plug the SD card into a new already set up Digital Bitbox to restore it. Via the options rider in the Digital Bitbox software via the “Mange Backups” button, you can now switch to the backup of your previous wallet.
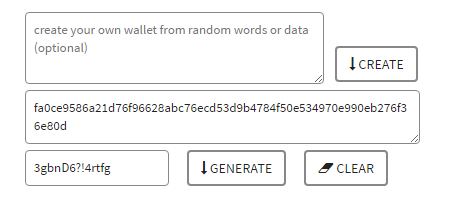
Generate a random wallet yourself
If you don’t trust the random generation of your private key by the hardware wallet , you can also generate a wallet yourself via this open source Java program.

Generate a wallet of random data to bypass the hardware wallet ‘s RNG
To do this, you enter random data into the first text box and then click on the Generate button. At the end of the form, you now set a name for this wallet (no blank and special characters) and click on “Export PDF.”
This .pdf file is now copied to the Micro SD card in the subfolder/digitalbitbox/to the other backups.
Specially generated wallet as usual to restore over the options
Via the options rider in the Digital Bitbox software via the “Mange Backups” button, you can now switch to this self-generated wallet by clicking the Restore button.
In the following window you are asked for a password. Since none was specified when it was generated, one is now chosen. Part of the BIP39 protocol is that each password opens a valid but different wallet. So as long as you use the same thing with each recovery, you can access the same bitcoins.
FIDO Universal 2nd Factor Device
With the firmware version 2.1.1, the Digital Bitbox is also an official FIDO security key to use as a second factor, for example with Dropbox or Google.

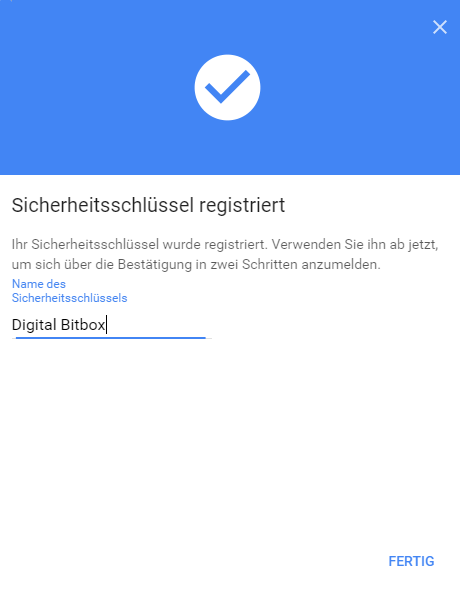
To do this, you register the Digital Bitbox with the corresponding service, in my example with Google.
If you sign up next time, you have to connect the Digital Bitbox and tap once in addition to your username and password.
Multisignature Wallet
The Digital Bitbox can be a member of a Copay multi-signature wallet for each wallet generated.
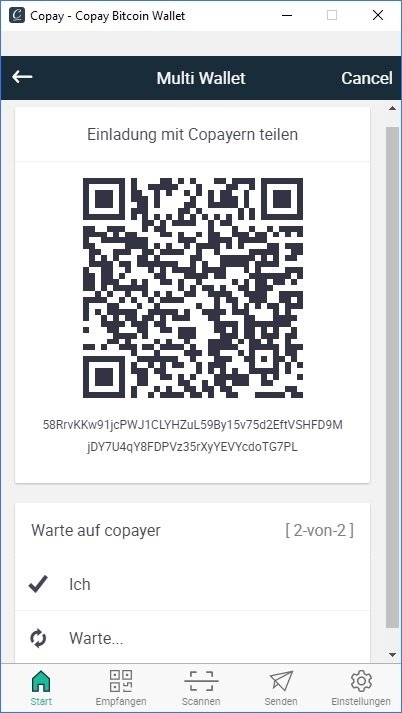
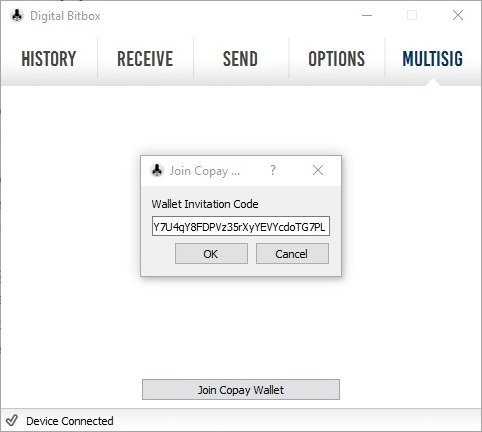
To do this, download the Copay Client and create a Multisignature HD Wallet without registering. You can now share this wallet with other copayers or with a digital bitbox.
If you now want to send Bitcoins from this wallet, depending on the settings set, several participants of the transaction must agree to it.
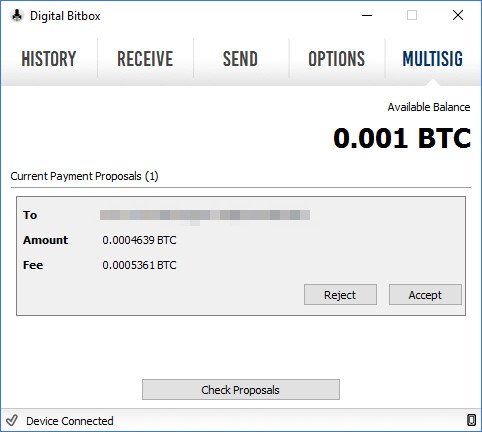
Transactions awaiting action appear in the Multisig Tab
A box with all the necessary information will appear in the Digital Bitbox. Now you have 24 hours to agree to the transaction. As usual, you have to verify the transaction using the Touch button of the hardware wallet .
With the Digital Bitbox itself, you can’t make transactions through the Multisig Wallet, you can only agree or reject them. Even if the multi-signature wallet exists next to the actual wallet, it is co-secured via the same backup.
Handling: Conclusion
I like the fact that the software was written directly for the corresponding operating system and you don’t rely on a special browser, for example.
The basic “send” and “receive” functions of Bitcoins are easy to use and performed quickly. Confirmation via the touch button on the device itself is always reliable. However, I miss here (still) basic things like the amounts used directly into a “conventional” currency such as euros or select all existing coins in a transaction. However, these features are already being worked on, as Douglas Bakkum told me.
There are also many useful options, such as the ability to manage multiple wallets simultaneously with a hardware wallet and quickly switch between them, only with the help of the wallet password. In addition, you can use the BIP44 protocol to generate addresses or use the Digital Bitbox as a participant in a multi-signature wallet via copay. I also really like the opportunity to use the Digital Bitbox as a universal second factor (U2F).
Compatibility
The Digital Bitbox supports Bitcoin and since version 2.2.2 the crypto currency Ethereum (ETH, ETC, and ERC20 tokens).
For this purpose , the software MyEtherWallet is used and not your own client. In this case, this is only needed for the setup or just to manage its Bitcoins. For more information on how to use Ethereum through the Digital Bitbox, please visit the official website.
The Digital Bitbox is compatible with all popular operating systems:
Only the Windows Client was tested.
For mobile operating systems, there is an official Smart Verification and two-factor authentication app. However, in order to perform an action, there must always be a client installation under the above operating systems. An independent mobile use on the smartphone via an OTG adapter is therefore not possible.
The Digital Bitbox is also compatible with other services and wallets:
Compatibility: Conclusion
Digital Bitbox started out as a pure Bitcoin hardware wallet, but now also supports Ethereum and more cryptocurrencies are likely to follow. Support for the Tor network, multi wallets via Copay or use as a universal second factor are other great features.
The only negative point is that the hardware wallet cannot be used mobile until now.
Security
The final section of the test addresses the security features offered by the Digital Bitbox.
The Swiss-based Digital Bitbox advertises itself as a “Swiss hardware wallet and is therefore supposed to stand for quality and privacy without back doors, according to its own statements.
In principle, as with any hardware wallet , the keys are generated offline by the device, making them dependent on the hardware used.
To do this, Digital Bitboxindicates that all cryptography is done on the microcontroller and this code is completely open source. However, the Random Number Generator of the ATAES132A used is a black box. But you can bypass this by generating a wallet with your own random data via the backup tool.
In terms of privacy, Digital Bitbox Tor and Tails OS offers compatibility.
Password
The device is protected with a password, as is any backup.
If the device password is incorrectly entered 15 times, the device will be reset. This prevents brute-force attacks.
If you are forced to give out the recovery password of a wallet, you can simply call it a wrong one. Because each password generates its own working wallet, to which you can also transfer coins.
The current device password can also be protected by a hidden wallet .
Smart Verification and Two-Factor Authentication
You can use a smartphone as a large screen for securely verifying transactions and addresses created by the digital Bitbox. This prevents man-in-the-middle attacks on computers that have been completely compromised and may have been manipulated to display addresses.
As an option, you can also use the mobile phone as a second authentication device.
Pairing
To set this up, you first need to download the corresponding app from the App Store. The links can be found on the Digital Bitboxwebsite.
Now open the app and follow the instructions.
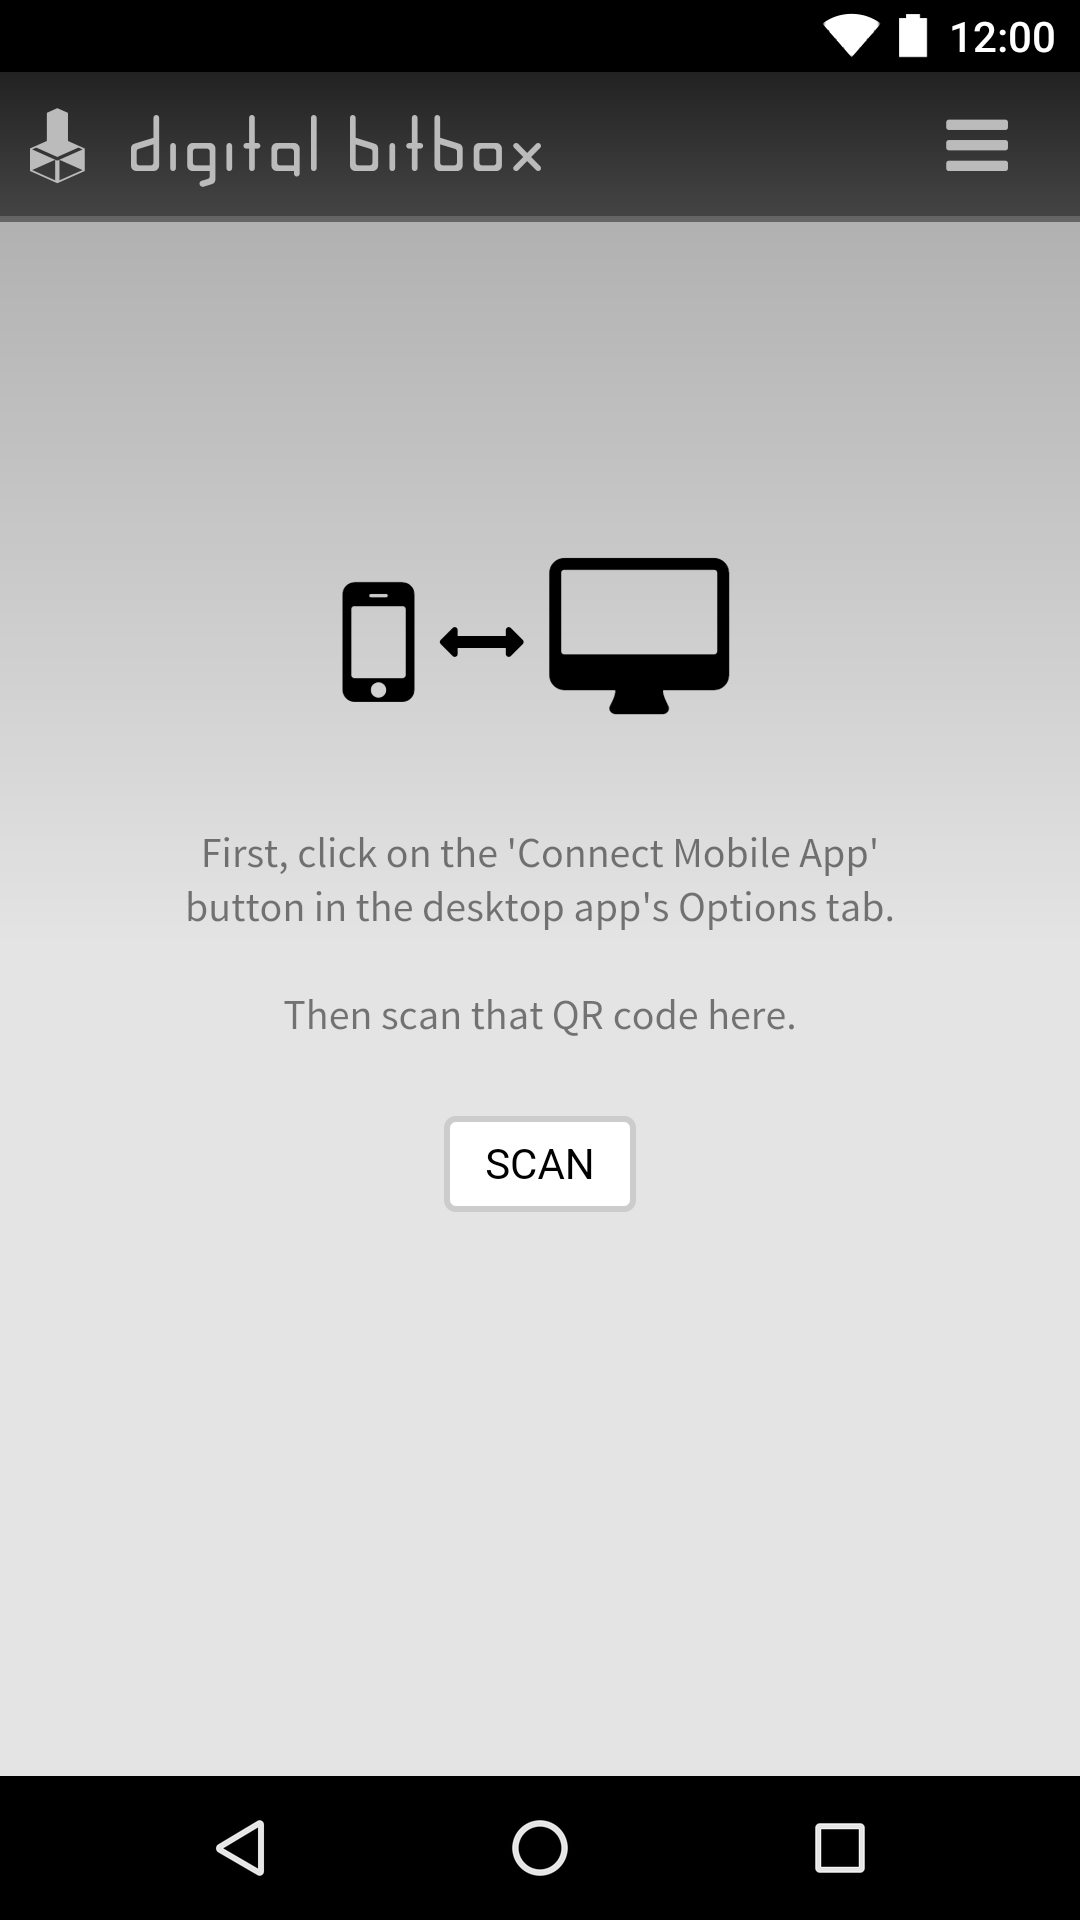
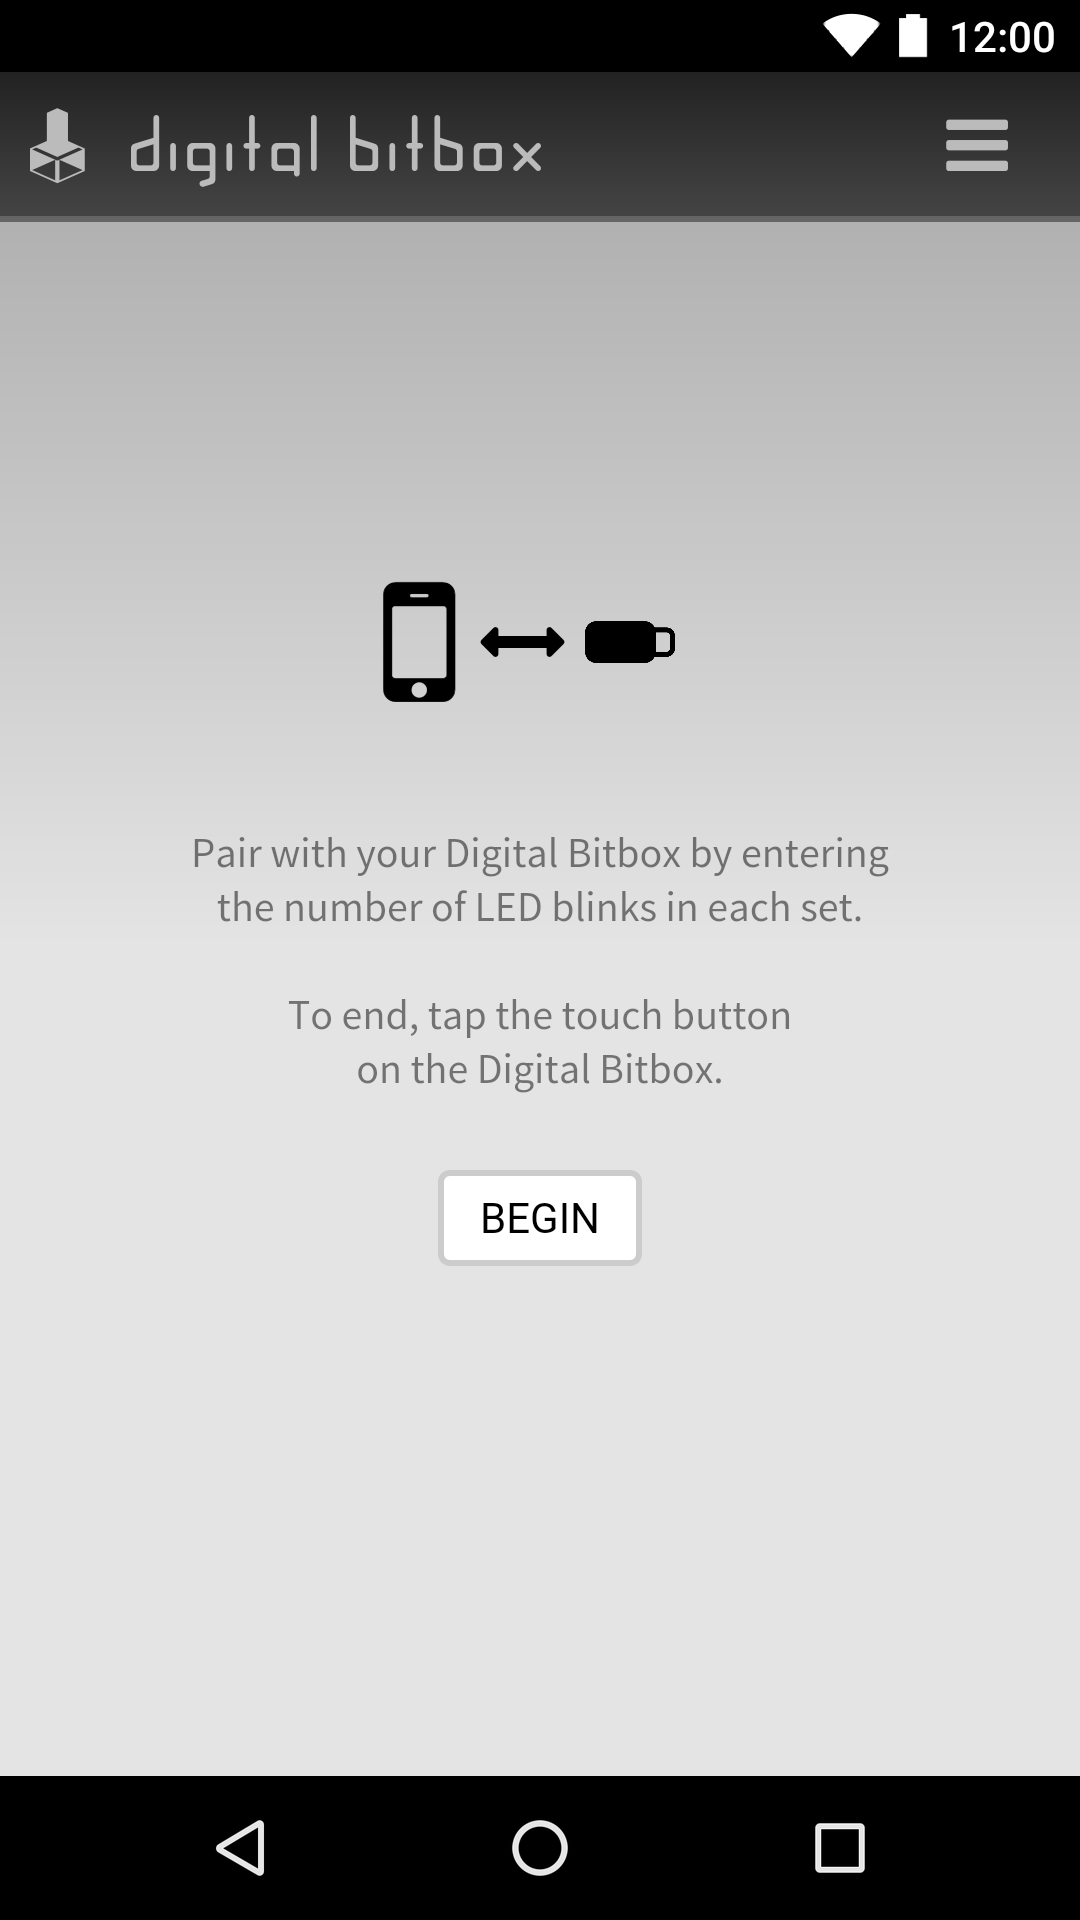
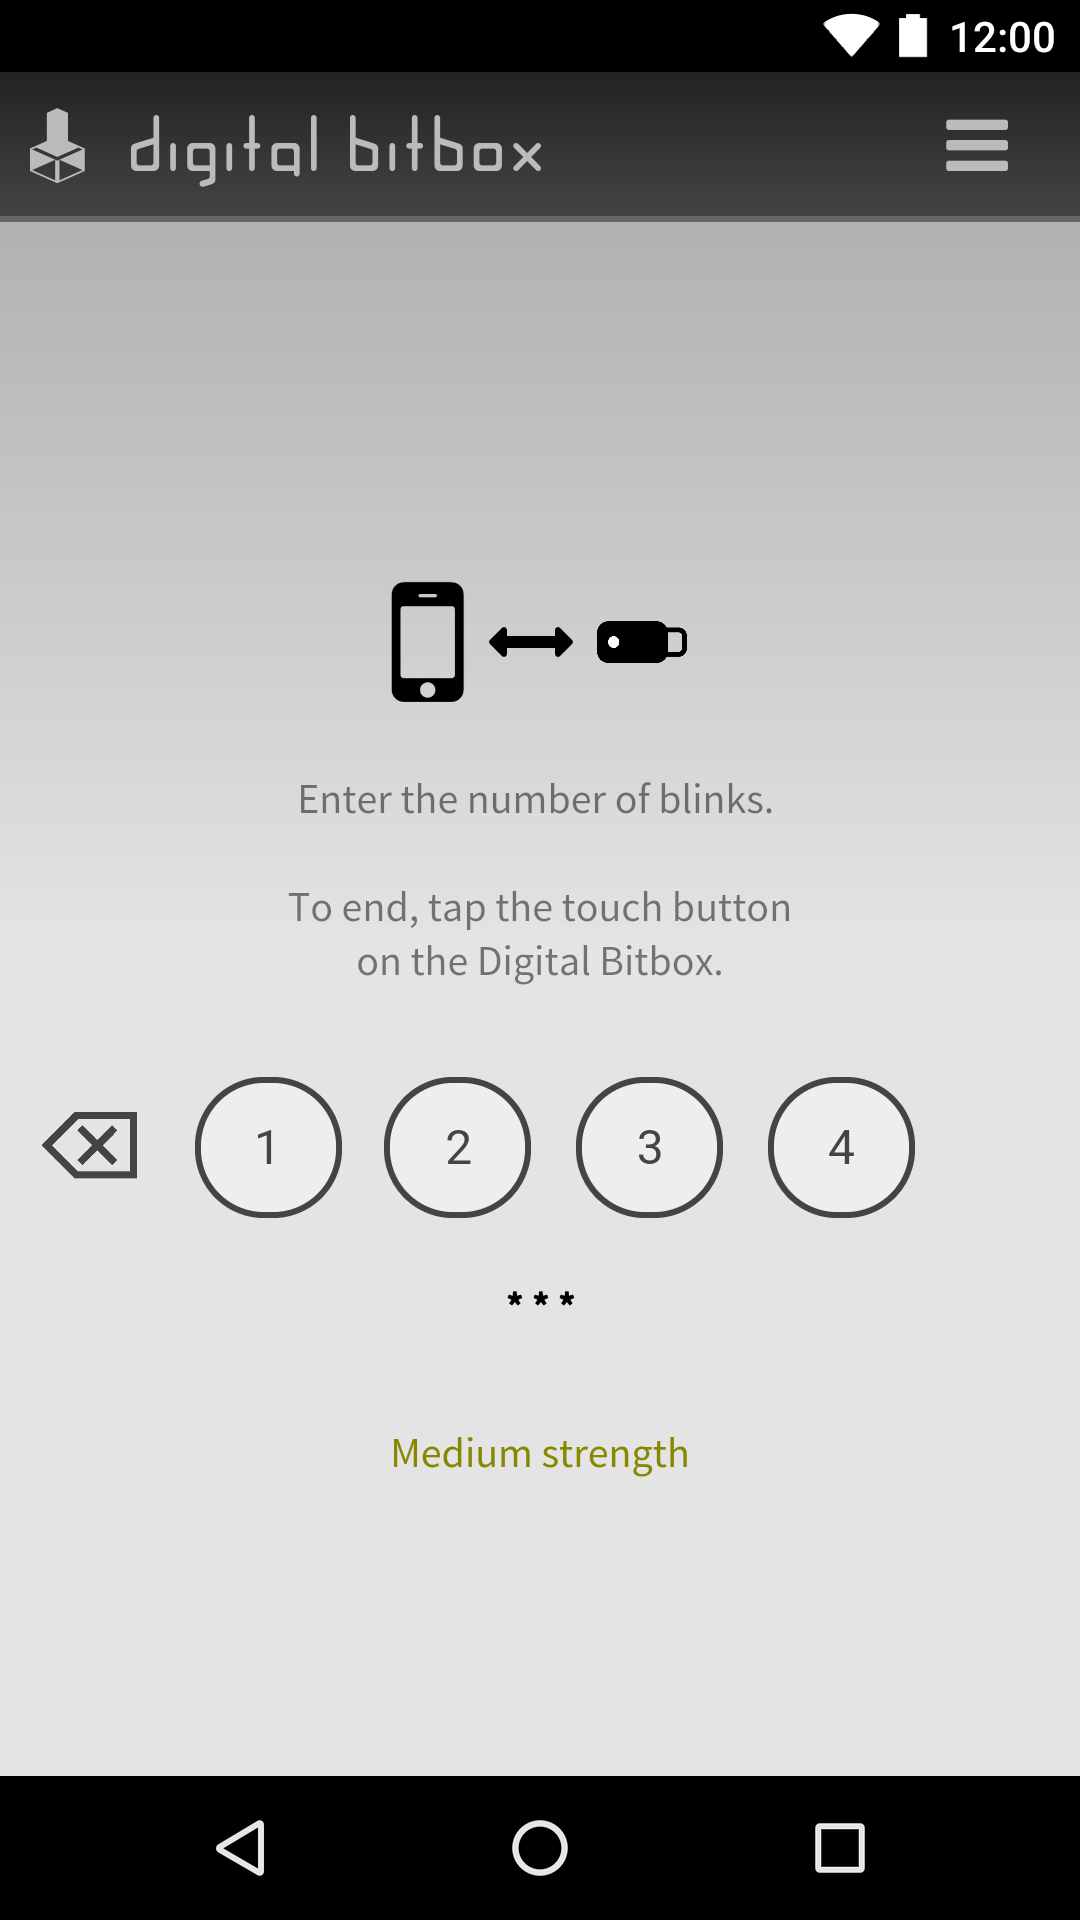

The pairing is started by scanning a QR code that is issued by the client software.
Additional safety when pairing is guaranteed by the transmitting information about the LED. This includes simply as long as you want the flashing of the LED and then confirms the action with a one-time click on the touch button.
If the pairing was successful, an encrypted connection has been established between hardware wallet and smartphone. This means, to put it simply, the smartphone is now the hardware wallet screen.
Smart Verification
Smart Verification allows you to verify information displayed in the software via the smartphone display.
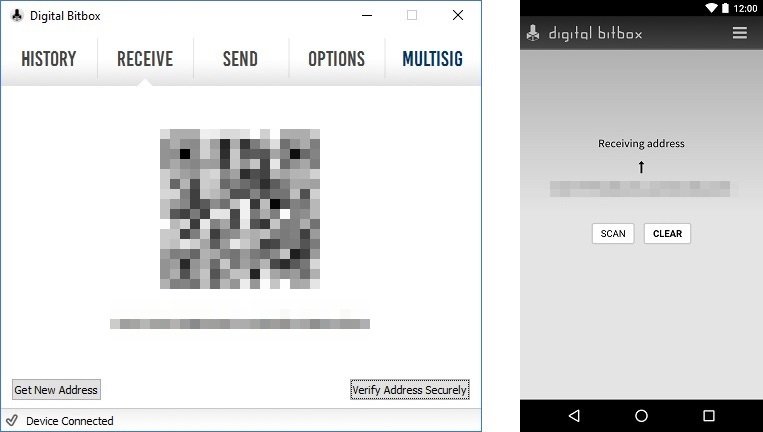
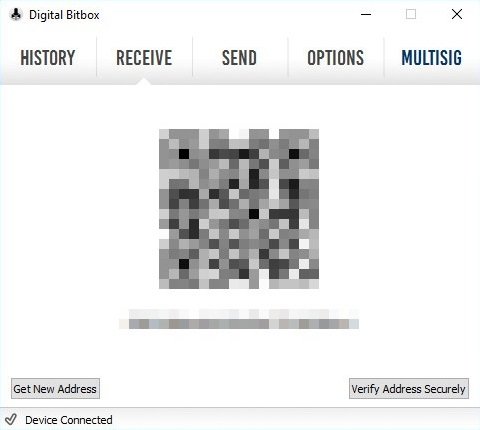
The generated receiving address must match on both devices
If the smartphone has an internet connection, click on the “Verify Address Securely” button at the recipient address. If both addresses match, you can be sure that it is a correct address.
The recipient address must match on both devices
When you send it, the information is automatically sent to the smartphone. You can also learn more about the transaction, such as outputs, inputs, and hashes to sign, through the Button details.
Two-factor authentication (2FA)
In addition to smart verification, two-factor authentication can be activated. This means that you always need your paired smartphone to confirm to spend bitcoins.
To activate 2FA, click “Enable Full 2FA” in the options. Since 2FA disables the SD card slot, it is important that the smartphone is already connected to the hardware wallet and that there are backups of all wallets. If you are aware of this, you can continue with “Yes.”
The action must be confirmed by pressing the touch button. The Digital Bitbox is then in a closed state until it is reset to the factory settings , which is why not all functions are available.
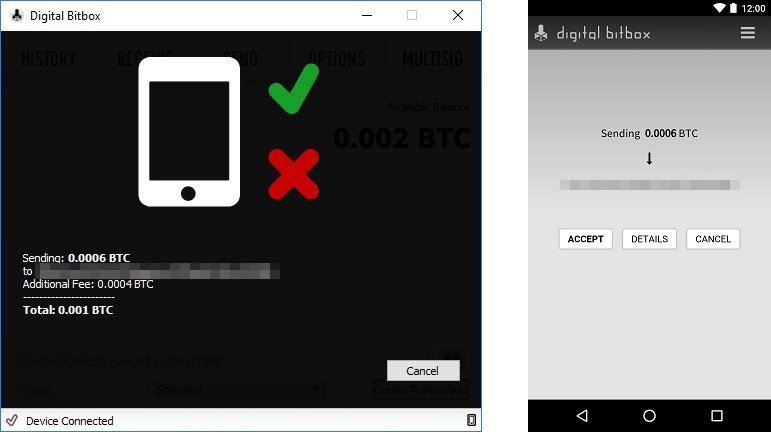
The transaction must also be confirmed via the smartphone
If you are now making a transaction, it must also be released via the smartphone before confirming it via the Touch button as usual.
This means that no transaction can be carried out without a paired smartphone with an internet connection. If you delete the app or lose your mobile phone, you have to reset the Digital Bitbox to factory settings and restore your wallet from the backup.
Hidden Wallet
If you are forced to issue your current device password, a hidden wallet can be helpful. Instead of your real password, you then issue a different, predetermined password, which opens a second wallet.
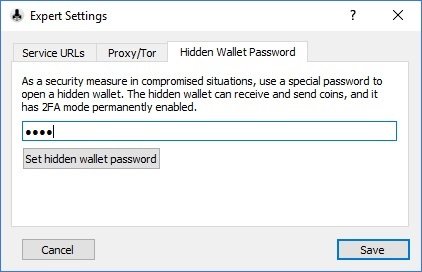

To set up a hidden wallet, you’ll go to Expert Settings Hidden Wallet Password in the options and set the second password. > As always, the action must be confirmed with the Touch button. If you reconnect the device and enter the hidden password, you won’t get a mistake, but a normal wallet opens. As with a two-factor authentication wallet , this is in a locked state so you can’t see backups.
Via the “Receive” tab, you can transfer money to this hidden wallet as usual.
Security: Conclusion
The confirmation of an action on the hardware wallet itself is done with a simple touch of the button. Since the hardware wallet itself does not have a display, a lot of security is lost in this standard mode: Without activated smart verification or two-factor authentication, you cannot determine whether the transaction has been tampered with and not a Very different transaction on the device.
On a positive note, the smartphone as a “hardware wallet display” offers much more presentation possibilities: So you can already see all the essential information for a pending transaction at a glance, which is on a small Display, as with the Ledger Nano S, for example, is not possible. If you think further ahead, verifying entire documents, for example, is not a problem. And since you usually almost always carry your smartphone with you anyway, this approach to a large and expensive device like the Ledger Bluewith an integrated display is certainly more interesting for many.
On the other hand, the password required to restore a wallet is always typed using a normal keyboard. This allows this to end up in the wrong hands by infesting computers. While access to the recovery files on the SD map is still necessary, this poses some risk.
On the positive side, the Digital Bitbox is completely open source and even offers the possibility to bypass the random generation of the wallets by the Digital Bitbox and to generate one yourself on the basis of its own random data.
By betting on different accounts based on the same seed on simply switching between different wallets, a compromise of a wallet does not affect all accounts.
Anyone who uses their Digital Bitbox in conjunction with Smart Verification at least and keeps their SD card in a safe place with the backups is, in my opinion, very well protected with the Digital Bitbox.
Product Specifications
| Advantages | |
| Disadvantages | |
| Compatibility | Copay, Electrum, MyEtherWallet, FIDO/U2F, Tor, Tail OS |
| Cryptocurrencies | Bitcoin, Bitcoin Cash, Litecoin, Ethereum, Ethereum Classic, ERC-20 Tokens |
| Package Contents |
|
| Brand | SHIFT Crypto |
| Platform | Windows, Linux, Mac |
| Altcoin Support | |
| Supported Coins | 6 |
| Open Source | |
| Secure Element | |
| Display as 2FA | |
| Interfaces | USB, microSD |
| Input Options | Touch Button |
| Weight | 4g |
| Size | 18x41x7mm |
User Reviews 2
I have been using this product for nearly 2 years now. I liked the different approach and above all the small size. However, I occasionally run into software bugs. Nothing too bad if the manufacturer helps quickly. But this time I was unable to transfer any crypto because the iPhone companion program (needed to finally confirm the transaction!) did not work. “Customer support” of shiftcrypto did not reply on 4 mails until today. That is a fat red line in my book. I would not buy anything from them anymore.
Yeah Ive got 2, they have worked perfect for BTC. Ive never been able to upgrade to LTC or anything else. Ive reached out for customer support, which does NOT exist.
FAQ 1
Ask your own question